1994 RWD Single Cab Toyota Pickup Build

Sure @jannytsunami . I’ll share some more pics at some point.

The short story is that I bought a cargo net based on some suggestions here. It was not a good solution for a V2, as you said. First, the frame mounting points are in the wrong location to mount it. Second, when stuffed with my bedding, it blocked the rear window.

My solution was to create a rectangular frame from thin aluminum extrusion. The frame is the same length as the fixed bed area at the front, and wide enough to just touch on both sides. There is also a crossbar right over the center of the rear window, so that no matter how much stuff I cram in there, it cannot block the rear window completely, it just swells down on either side. I’ve thought about adding another crossbar here.

I made a series of aluminum brackets on my waterjet that connect the extrusion directly to the frame attachment points. I’m considering selling a set of these so other people can reproduce this setup. They’re easy to make, just a strip of aluminum with two holes. One to attach to the frame attach, the other to bolt into the extrusion.

Then I took the “useless” cargo net and stretched it over the frame. I zip tied it in a dozen places so it was under reasonable tension, and covering the entire frame. That worked pretty well overall.

@Vice_Chief - You can absolutely cycle the panel farther. We would advise that you remove the struts and cycle it upwards; you’ll find the soft limit of the hinge by feel. Please be mindful when modifying as that the struts will need to be able to close without bottoming out.

Hope that helps!

2 Likes

Thank you - I’ll give it a shot, and also I heard back from Support today.

First post updated with an index to all mods, camps, and aero studies. I’ll try to keep it up to date.

Opened the tent today - has been raining in SoCal. Filed SRF

Solar and electrical info post

I decided on a minimum of 300W of solar. That’s based on the following needs:

  • Razer laptop for CAD work: 230W max draw
  • Starlink or other mobile internet: 30-60W
  • Phone charging: 10W
  • Dometic fridge: 30-50W while cooling

In practice almost every one of these numbers gets derated, but it’s still a healthy power draw. Also, I can’t always count on that sweet sweet California sun. My plan is to work in this thing like an office for 2-3 days at a time. Power has to be there.

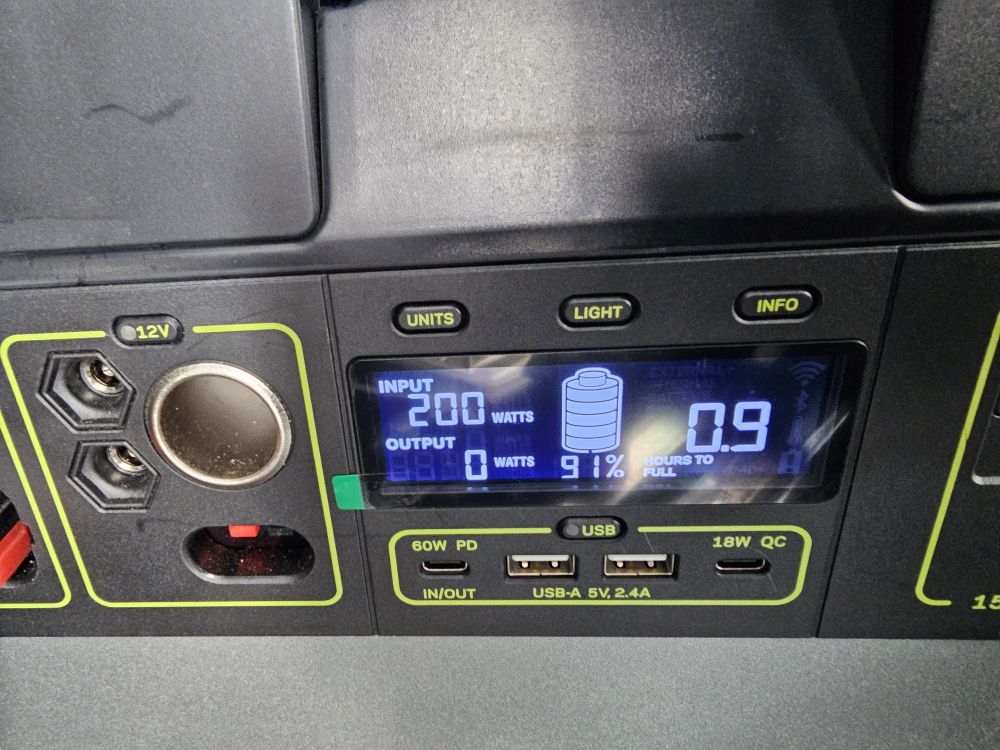
I purchased a refurbished Goal Zero Yeti 1000x from Goal Zero’s store. This was a mixed bag. The first one had a high power input port that was broken in a strange, specific way that took a while to figure out. Between 12 and 19 volts, it would short the panels. Below or above that it would work fine. I’m still in the returns process, and ended up just purchasing another unit to get going.

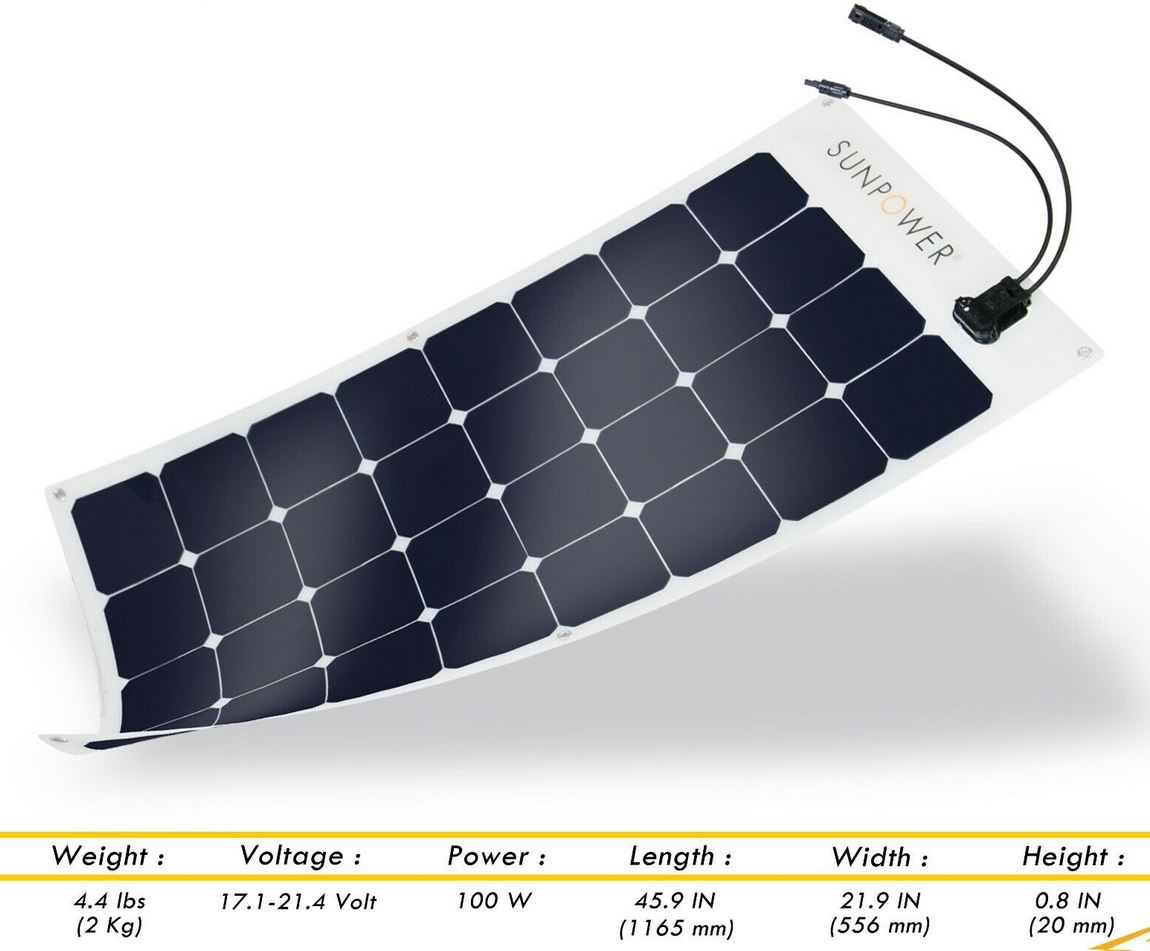
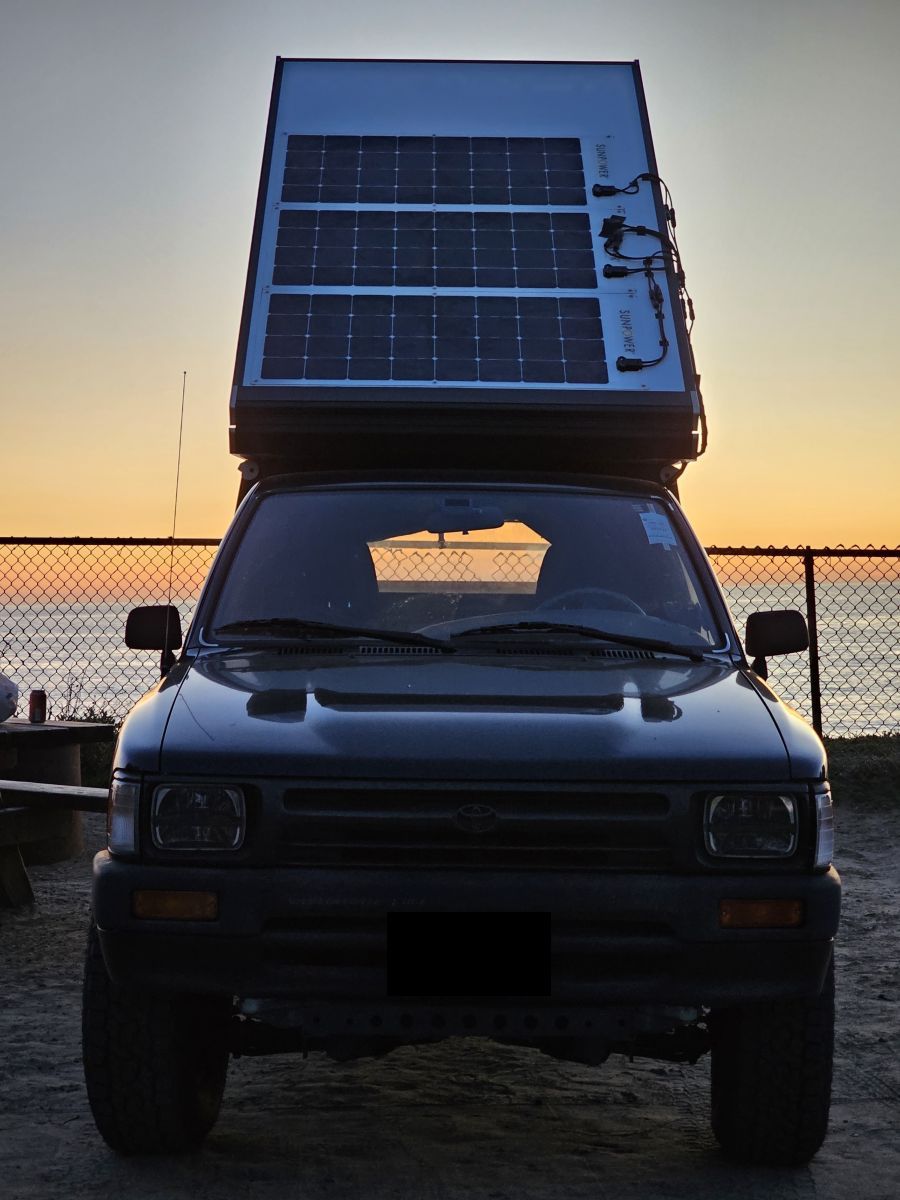
I bought flexible panels. I know they have a bad reputation for longevity, but I have a specific idea here. I want to have 3 permanent, roof-mounted panels, and I don’t want anything shading them (beef bars: bye bye). More importantly, I don’t want them interfering with the already terrible aerodynamics of my truck. I chose these Sunpower panels over the competition. They’re a little more expensive, but also more efficient - up to 25% efficiency per cell. So far they seem to perform exactly to spec.

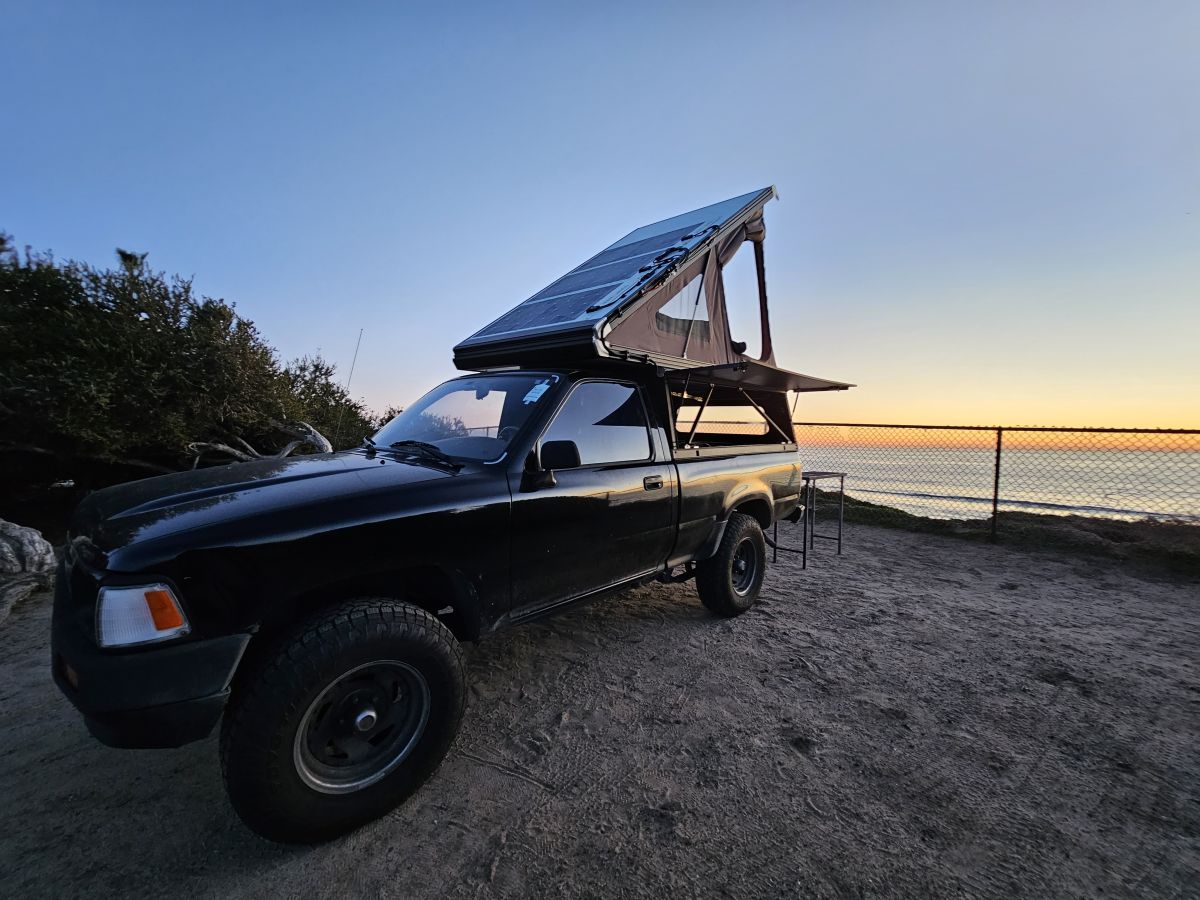
I did a prototype-level install to figure out how to run everything. The roof was cleaned with detergent and then wiped with alcohol. The panels were given a generous run of 3M VHB around the edges and across the middle, with gaps to ensure any trapped water could escape. I made 3D printed wire clamps and attached the wires to the extrusion.The install went smoothly and I promptly took it camping. I figured out a few more simple needs on this trip, like a little base for my working stool that mates with the ridges in the truck bed.

Everything power-related (fridge, solar, charging, yeti 1000x) worked as advertised and I was very happy. Unfortunately a huge wind/snow storm came in and I had to abandon camp and come back to LA. On the way I got sick as hell with some kind of stomach virus and a week later, I’m still recovering.

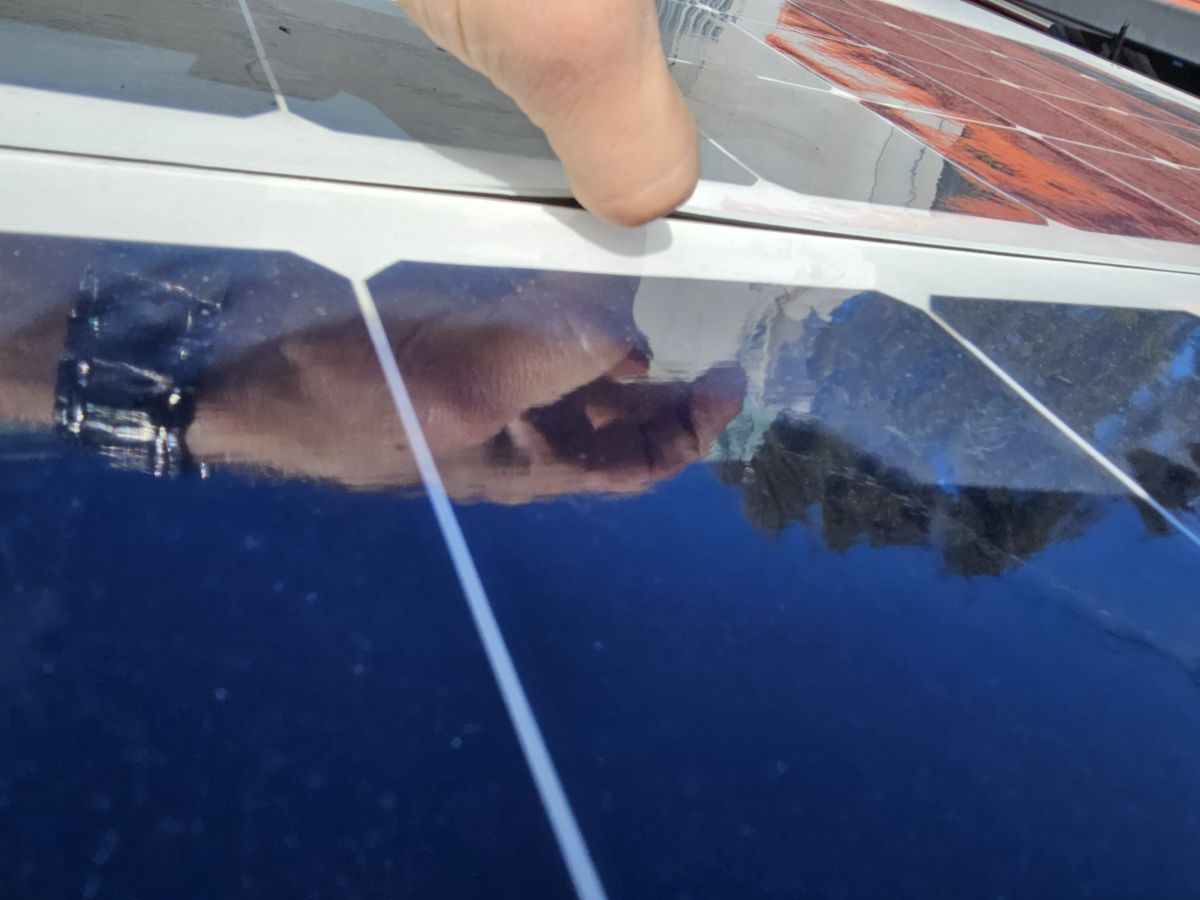
Today, we had some good sunshine so I wanted to air out the camper. As I was opening it, I noticed the solar panels separating from the roof. This picture doesn’t really show how bad it was, they were actually falling off and it was not a safe situation. I was very careful cleaning and used genuine 3M VHB (the high strength black stuff). The tape adhered perfectly to the panels themselves but peeled from the roof. This leads me to believe that the honeycomb roof panels may be made of polypropylene or another low surface energy plastic. Generally, bonding anything to a low surface energy plastic is tough. At a minimum you need to use a primer. With 3M VHB that primer is Primer 94. I have a 500ml can on order. . I bought mine from Amazon, because McMaster doesn’t carry it. If anyone has a better source, I’m all ears. Most 3M stuff on Amazon is a crapshoot of counterfeit and expired products.

I was pretty bummed about the panels, but it looks like the water intrusion fixes will have me removing and possibly repositioning the panels anyway. So for now I’m just going to take it in stride, and when the time comes, carefully peel it all off and redo it with a cleaned and primed surface. I’m temped to use 3M Dual Lock the 2nd time around, because then if I need to remove the panels, they’ll just snap off. However Dual Lock, the big stuff SJ3350, 250 pins/in, is crazy expensive. I’d probably need $150 worth of Dual Lock. Another thought I have is to seal 3 edges with Sikaflex or whatever GFC uses.

I will continue to update this post with solar and electrical information as I get time. I’m a little bummed that it’s March and I’m not yet really using my mobile office, but it’s just going to take the time it takes.

2 Likes

I had fun using the cabana panels for boot storage while relaxing. Looking at these pictures it’s clear, I need to get out again this weekend no matter what, even for a short time.

The Kitchen Crate got a minor upgrade in the form of a military surplus hatchet and some Quick Fist clamps. I learned about Quick Fists from @stickyTaco 's thread here. Thanks! They seem like a great match for the GFC and I can see other uses for them as well.

4 Likes

Athletic makes all the best NA beers. They’re shockingly close to the real thing.

3 Likes

Interesting on the 3M VHB tape. Vernacular Sewn Storage who makes the Top Shelf (a storage pouch that attaches to the inside of the panel) uses VHB, and a friend uses VHB for his solar panel on his RTT. So, you should get good results, but VHB can be interesting depending on what you get from Amazon (I have two different kinds, one with white peel and the other with the more standard red peel and I think the white is much weaker).

One thing I have noticed when I had to re-attach a trim/door panel on my GX with new tape and clips, is that VHB is very poor when it’s cool out. I had to heat the tape up with a heat gun to get it super tacky and activate the adhesive and then get the panel mounted and it’s been solid. Granted that is plastic to metal. This is the red peel.

I had a different project where I used it cold/room temp (though in the building garage it’s cold), and that didn’t take very well (which is a reminder to re-do it, though that bit lives inside). This is the white peel (this is also a wide tape at 2" compared to the regular red kind).

2 Likes

Thanks. It certainly surprised me - I use a ton of VHB in my prototyping work and rarely, if ever, have problems.

I’m using the black outdoor adhesive VHB with red peel (3M 5952). I get my VHB from a local distributor instead of Amazon because of the counterfeit issues. I’d say it was about 55-60F on the day of application, some sun but not much. Cold could very well have been a factor, also I did press it all down a couple times, but didn’t roll it. There might also be a kind of peel effect going on, where the flexible panels are shrinking enough to slowly pull back the edges.

In any case I have to remove the solar for the roof retrofit. So this is on pause/I have time to test primer and cleaning while I wait for the retrofit to be scheduled.

I’ll note here for posterity that 5952 is spec’d as medium strength for LSE surfaces, and there are LSE varieties of VHB. But primer and application on a hot day may just solve the whole thing.

Figured you were well familiar. It surprises me as some times it works better than other times even with the same tape.

Do you find it “stales” or needs to be stored correctly?

1 Like

I appreciate the input in any case! Always excited to get another POV or learn about something new. And I think you might be right about the cold. Cold + LSE plastic… not a good combo.

The white acrylic VHBs definitely age, especially at the edges. You can actually see them turn yellow and brown, and they become stiff. I haven’t personally seen the same effect in the gray/black, but I don’t have any rolls that have lasted me over a year.

The primer I’m going to try has a shelf life of 18 months. I keep most of my adhesives in a fridge.

1 Like

I appreciate the input in any case! Always excited to get another POV or learn about something new.

Same. I’ve been enjoying your thread!

1 Like

Another solar surprise. I imagined that the roof would be cooler due to being shaded by the panels. But in fact the roof is 108F in the areas covered by the panels, and only 94F in open areas. I used black vinyl tape to match the roof emissivity with what the thermometer expects, so these numbers are reasonably accurate.

Looks like an air gap is needed to prevent that heat from conducting into the roof. I may end up buying rigid panels or constructing a frame after all. Huh.

I’m seeing some interesting solutions involving twin wall polycarbonate and/or thick coroplast. Basically mounting the flexible panels to coroplast for an air gap, and then mounting that to the roof. I’m considering that pretty seriously.

1 Like

good to know thanks for sharing the information

1 Like

Well I am definitely curious to see what your next steps are, @Vice_Chief, with getting a little more airflow under your solar.

I have been quietly watch as I appreciate you sharing your specific rig, way to represent! My “none-GFC-ed” truck is an '89 Pickup (22re). They are a neat little rig, and sure seems like they are getting fewer and far between.

Cheers!

2 Likes

Damn, that '89 is good looking. Congrats @MTSoul . And I agree, these trucks are both becoming very popular and also significantly harder to find at the same time. Mine is also a 22re. I only wish it was 4WD.

Thanks for the kind words. I think I’m going to try the Coroplast route first. It’s the cheapest, lightest, and most straightforward. Step 1 is probably just to get some Coroplast in-hand and do a test (I actually have a 4th unattached panel - easy to do comparisons with the panels already in place).

If Coroplast doesn’t work, I’ll be designing a low profile extrusion frame. I have all the tooling to make my own brackets and such, but I’d rather not build a frame if I don’t have to.

I’ll be sure to post anything I learn.

@Vice_Chief

I’ve started a new role and realized that my manager’s previous background included being THE MAN in CFD. I read his linkedin background and the man’s breathe of experience blew me away so to speak. He held the position of Chairman of the CFD advisory board at Boeing, responsible for developing rockets that could fly backwards, and ANSIS CFD Development. Needless to say, a national treasure and I’m stoked to learn from him. Once I settle into my new role, I’ll start seeking his advice. :slight_smile:

1 Like

That’s awesome @Ronmastas . Definitely interested in what you learn or any insights you can share. I’m using an ANSYS product here - ANSYS Discovery. It’s not super accurate CFD, the intent is more to enable CAD designer type people to explore general design trends early. I’m sure your boss will say, garbage in, garbage out. The way that these models get set up really determines everything. So in some ways software like this can be a bit of a footgun if you’re not careful. I’m pretty reckless in this regard - locked and loaded. Safety third.

Main problem I have right now (besides being a n00b) is that the truck model I have is a polygon model, and I need to remodel it in solids. The way this software works, you can get gross results from almost any geometry in real time (and play around with the shape and see the changes), but then there’s a “refine” step where small features are considered. At this scale, the Airtabs/vortex generators are small features. So I will only see their full effect the Refine step. I’m pretty committed to simulating this before I go sticking 40-50 plastic bits on my beloved camper.

I have about a dozen time consuming half finished projects on this rig (many that I haven’t posted about yet) so this one is just waiting for me to get inspired to do a bunch of tedious modeling again, so I can see the results on those airtabs.