2020 Ford Ranger Lariat Supercab GFC with Solar Panel Wind Fairing, Expedition One Bumpers, and Victron/Battleborn energy system

That’s actually one of our panels! They are made out of a carbon fibre foam core construction, so they are completely rigid and self supporting.

I made the frame for the solar panel out of 2020 parts. There’s a detailed slideshow here. I used red locktite too. It’s held up great. and yeah…suspension upgrades are coming :laughing: she’s a bit low now.

1 Like

The Thule parts I got from rackattack. I just redid what I picked for my truck for you. Rackattack fit your vehicle

I went with the Thule Evo Clamp system and windscreen. I’ve been getting 18.5-20mpg on the highway, so I think the Thule windscreen and solar panel definitely help.

1 Like

inspired by your “wind fairing” …what made you choose the Lightleaf solar panel over it’s competitors ?

I think for me it was that they’re used on a lot of tear drop campers. Right on the front. So I figured if they can stand up to that kind of abuse, it would hold up as a wind fairing, which it has so far (touch wood). I liked the slight arch in their gleaf panel, this one. And that the corners are designed with rubber grommets for bolts. The solar cell performance is pretty good too.
I didn’t want a flexible panel because I’d have to make a backer myself and glue the flexible panel to it, and I’ve seen a bunch of youtubers having to replace their flexible solar after a few years and then struggle to peel them up. I think with flexible panels they tend to not last as long and their efficiency isn’t as high, but they are improving. I’ve seen other carbon fiber composite backed panels, but the other ones I saw were more for sailing.

Adding some more photos of the solar panel wind fairing build, to save the click to my website. Parts are listed further up on this thread.


2 Likes

Last two key photos. to get the pivot hinge part on the end of the 2020 tubing, I tapped some threads. I’d never done that part before, but tapping in Aluminum is very easy and you can get a cheap thread tapper kit off Amazon.


2 Likes

Thanks.
You’re right regarding efficiency. I’ve been looking at flexible options , i.e this long , thin one:

but efficency is only 11% compared to the gLeaf which at 22% is double!

1 Like

Excellent catch @pigneguy ! Love reading stuff like this in the forums so we’re helping others figure stuff like this out. And thanks for sharing that link, I hadn’t seen that online store before. Love window shopping new sites! New to me anyway.

1 Like

agreed, always good to be part of a knowledge based community…especially in these politically divisive times.

1 Like

The new panels are actually 25.1% efficient! Also significantly more durable than flexible panels. Let me know if you have any other questions.

thanks for the info Nathan

Awesome Build! Well thought out and I love the attention to detail… I also went with 2-100AH Battle Born Batteries and am happy I went with that much battery storage. You cannot go wrong with Victron Components too!

1 Like

Thanks @Enduro_Woods_Rider!

2 Likes

I replaced the rear GFC panel’s led light strips this week. I’d used interior led strips ($20 for a 4 pack), but water must have gotten inside, ruining them.

I replaced them with this motorcycle light kit, only ~$42 on Amazon, click here Being able to change the color is awesome, also has dimmers in the remote.

The new led light strips are weatherproof, but the wire connections don’t seem that robust, so I used 1/2" heat shrink over each connection, which should keep the water out and also help keep the connections together. Before using the heat gun, make sure you test the lights first. Also the heat gun is great for making sure the adhesive mounts stick, when it’s cold out.


the old lights that failed

1 Like

Tis the season in the Northeast, I needed to do some winter-proofing of my batteries before it became a problem. Used these heater padshttps://a.co/d/h0Vlwjn. I have all 4 pads on a 12volt, 20amp switch. So I’ll only turn the switch on to run the heater pads only when Winter camping. Also, my batteries have BMS that protects them from charging if they’re too cold. Added the 16 guage steel plate so I don’t melt the battery box plastic.

I’ll remove the 1" thick, pink foamboard in the Spring, except for under the batteries, I don’t want to have to undo all the connections again. The heating pads will stay taped on year round too. Finally, I may add some strategic velcro to the outside of the battery box so I can add a blanket and keep it in place, if necessary.

The heating pads’ thermostat is for water tanks (turn on around 45F, off at 68F), but I wired a switch to easily shut the heating pads off entirely, and I have a Victron temperature sensor to monitor what’s going on in the battery box too.

This cost me <$100, and the battle born battery heaters are $200 each. I had leftover electrical parts, just had to get these switches, https://a.co/d/i9hTthT Not shown in the photos, there’s an inline fuse you have to wire in to. Don’t skip that if you try this.


1 Like

Ford Ranger Icon Stage 4 suspension upgrade. Made a huge difference with diving/lifting while start/stopping. Dramatically reduced side to side sway too. I’ll be replacing the stock 30.5" Hankook Dynapro ATM 265/60/r18 tires with 32" Falken At3w 255/70 r18’s Going to try the “pizza cutter” tires, not planning on a lot of rock crawling. I don’t want to kill my gas mileage.

Before/after photo, and shots of driver side front wheel well after removing the tire.


1 Like

Rear axle shots. Back in the Spring, I had the air bags and cast iron rear diff cover, but I’ve not posted photos of that before. Just the Icon and shock skids are new. The airbags help the single leaf spring a lot.


2 Likes

I removed the 2nd drawer, and replaced it with a cubby for a plastic bin. I relocated the original 2nd drawer to my basement; where it’s already filled with miscellaneous junk. The new design frees up room for 2 duffel bags and makes it easier to get to the batteries if I need to. Also the plastic bin makes it easy to load up with food stuff in the house, and carry to/from the house. This short 1 min youtube vid explains, (just me talking behind my smartphone, nothing impressive)

On the left side, there’s a pullout for my dometic fridge. Behind that there’s enough room for a porta potty and Ranger SoloStove. I won’t always be bringing a bike, but there’s room.

I realized I could fit more stuff in the duffel bags (which I made) than the original drawer, and it’s easier to unload/load the truck for trips with duffel bags.

old 2nd drawer that’s now in the basement

2 Likes

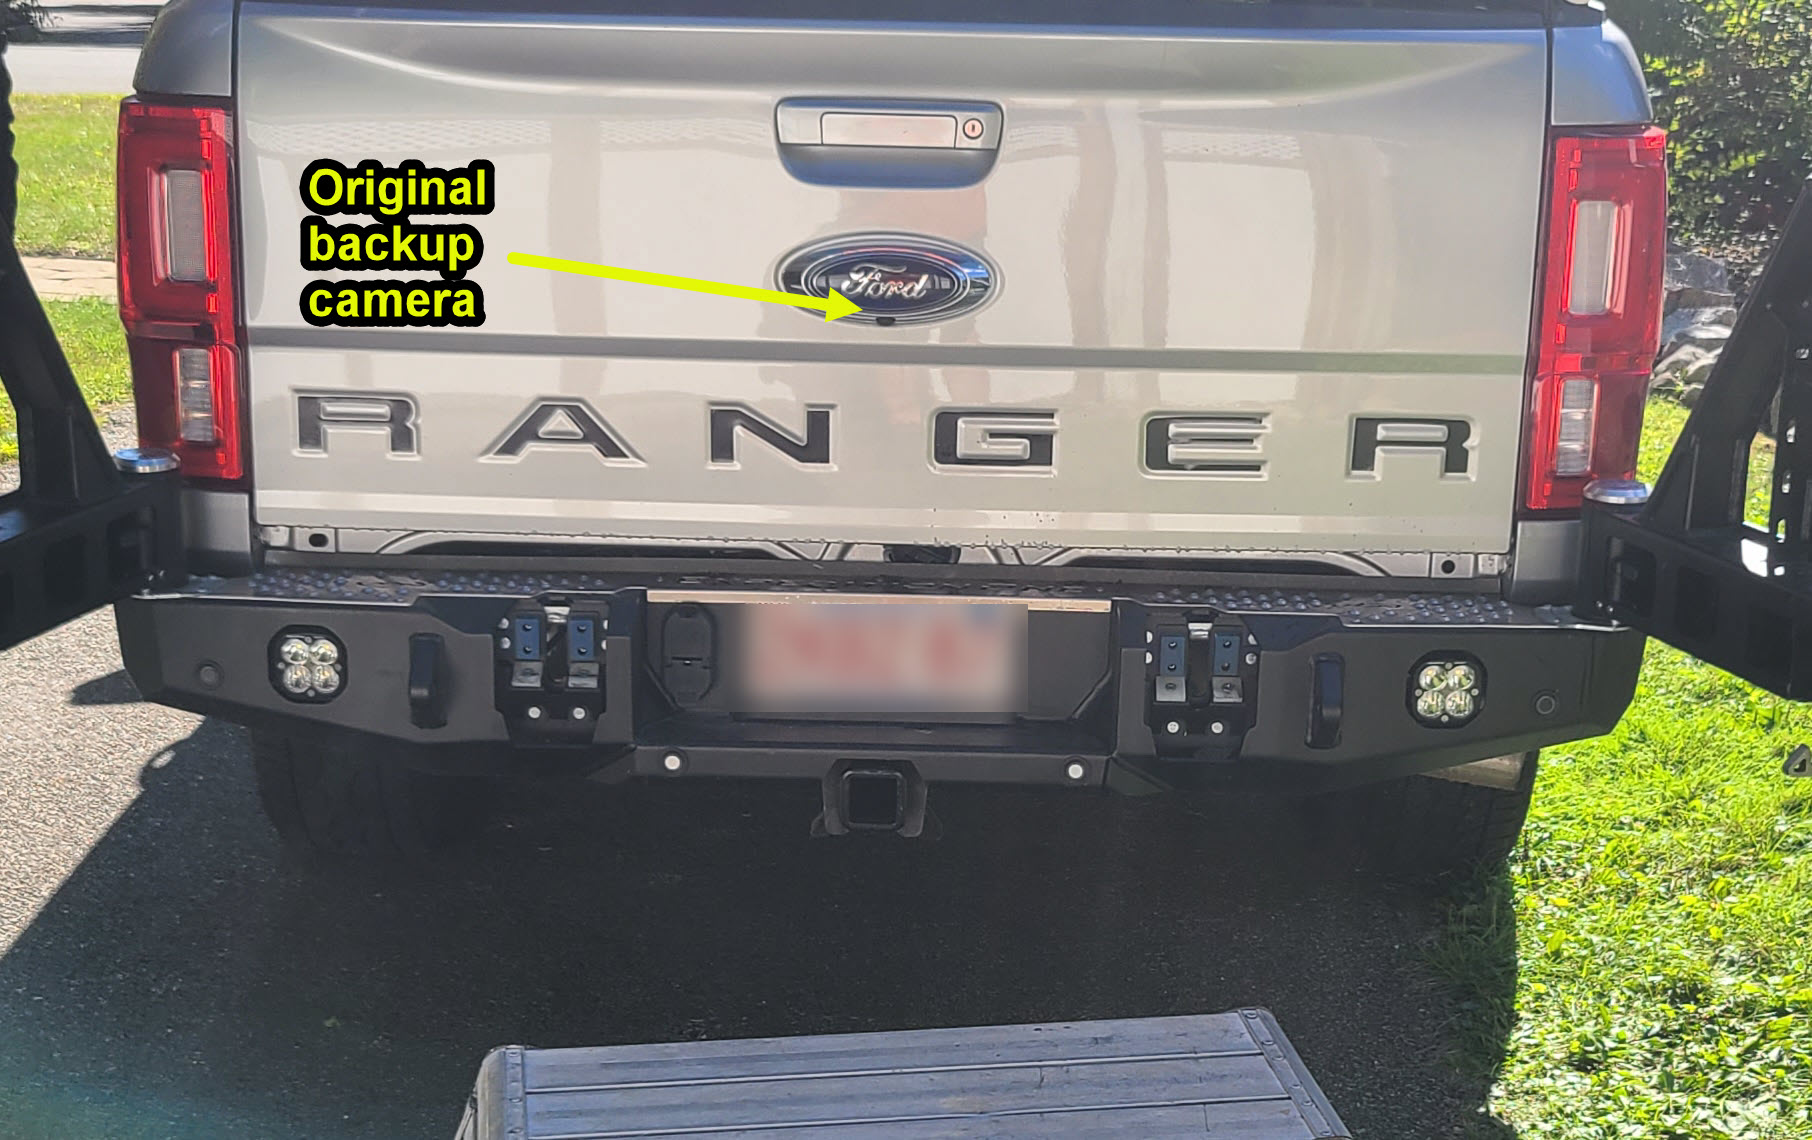
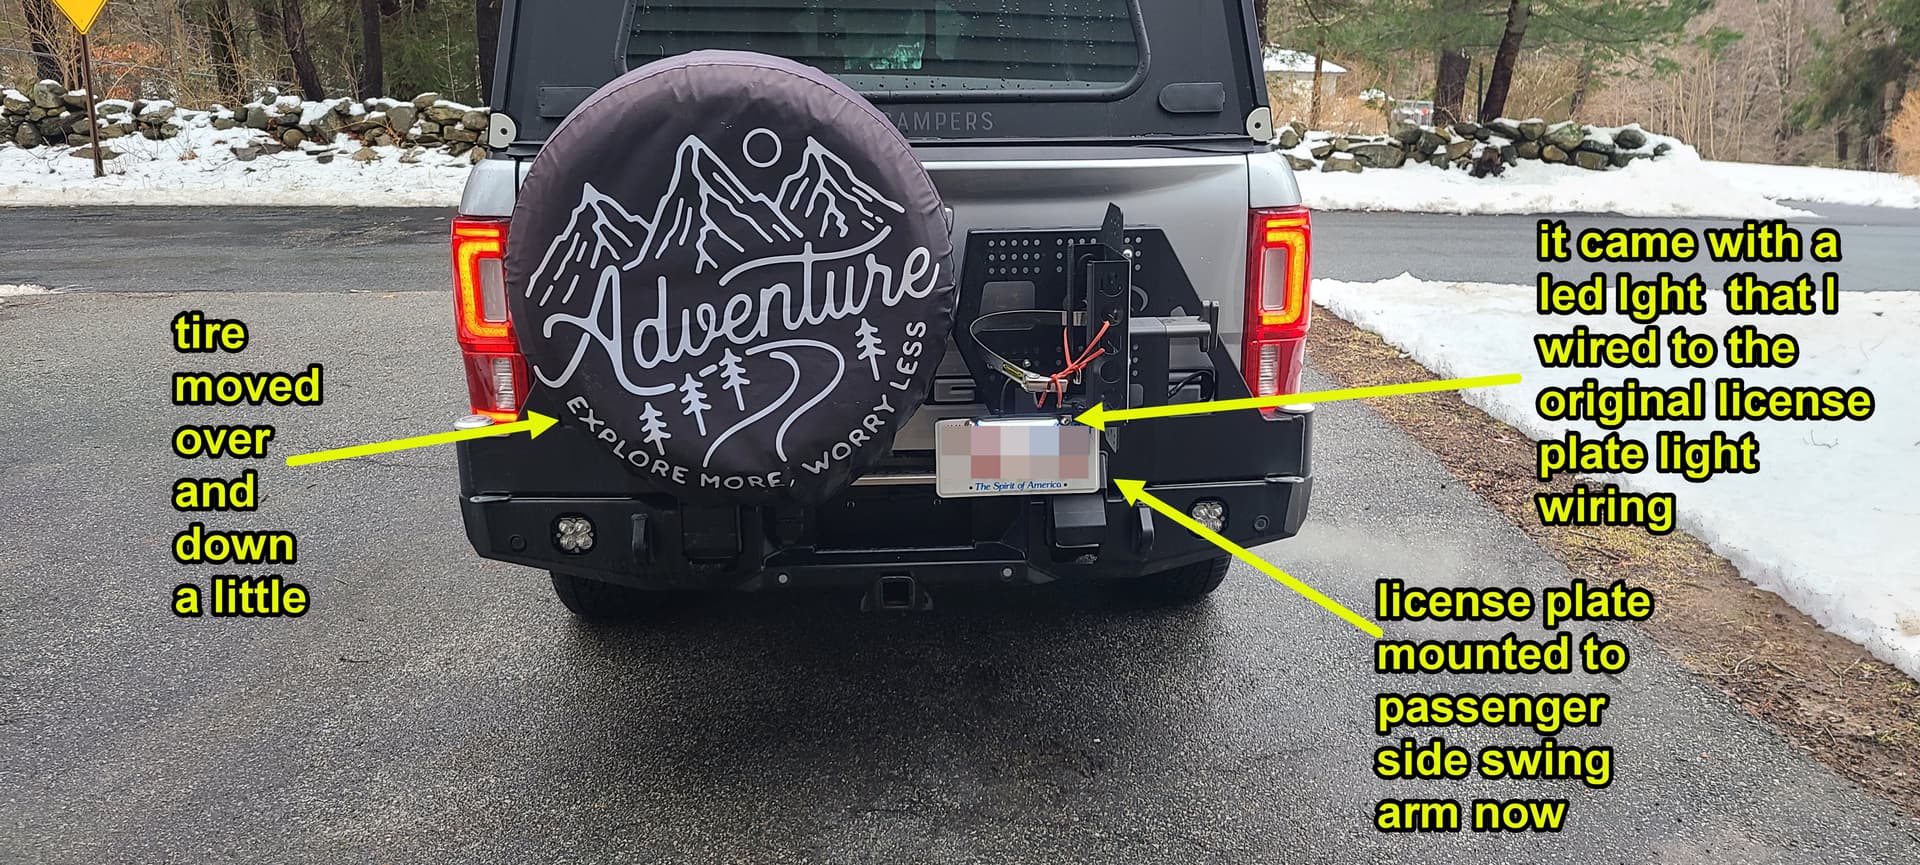
I didn’t like how buried my license plate was in the Expedition One rear bumper. It was making me paranoid I’d get pulled over by a bored police officer at some point. I also wanted to move the spare tire over more and down so it was more clear of the driver side tail light, but that would totally block the backup camera in the blue oval Ford Decal in the center of the tailgate

For about $180, I got this rostra backup camera. It has the same connection, so it’s plug and play.
250-8634-LPB 2021+ Ford Ranger Tailgate Camera Replace Kit - M&R Electronics Inc..
I used this https://a.co/d/1k85jQz to move my license plate to my rear bumper swing arm thing. Just cut the power line to the existing bumper light.

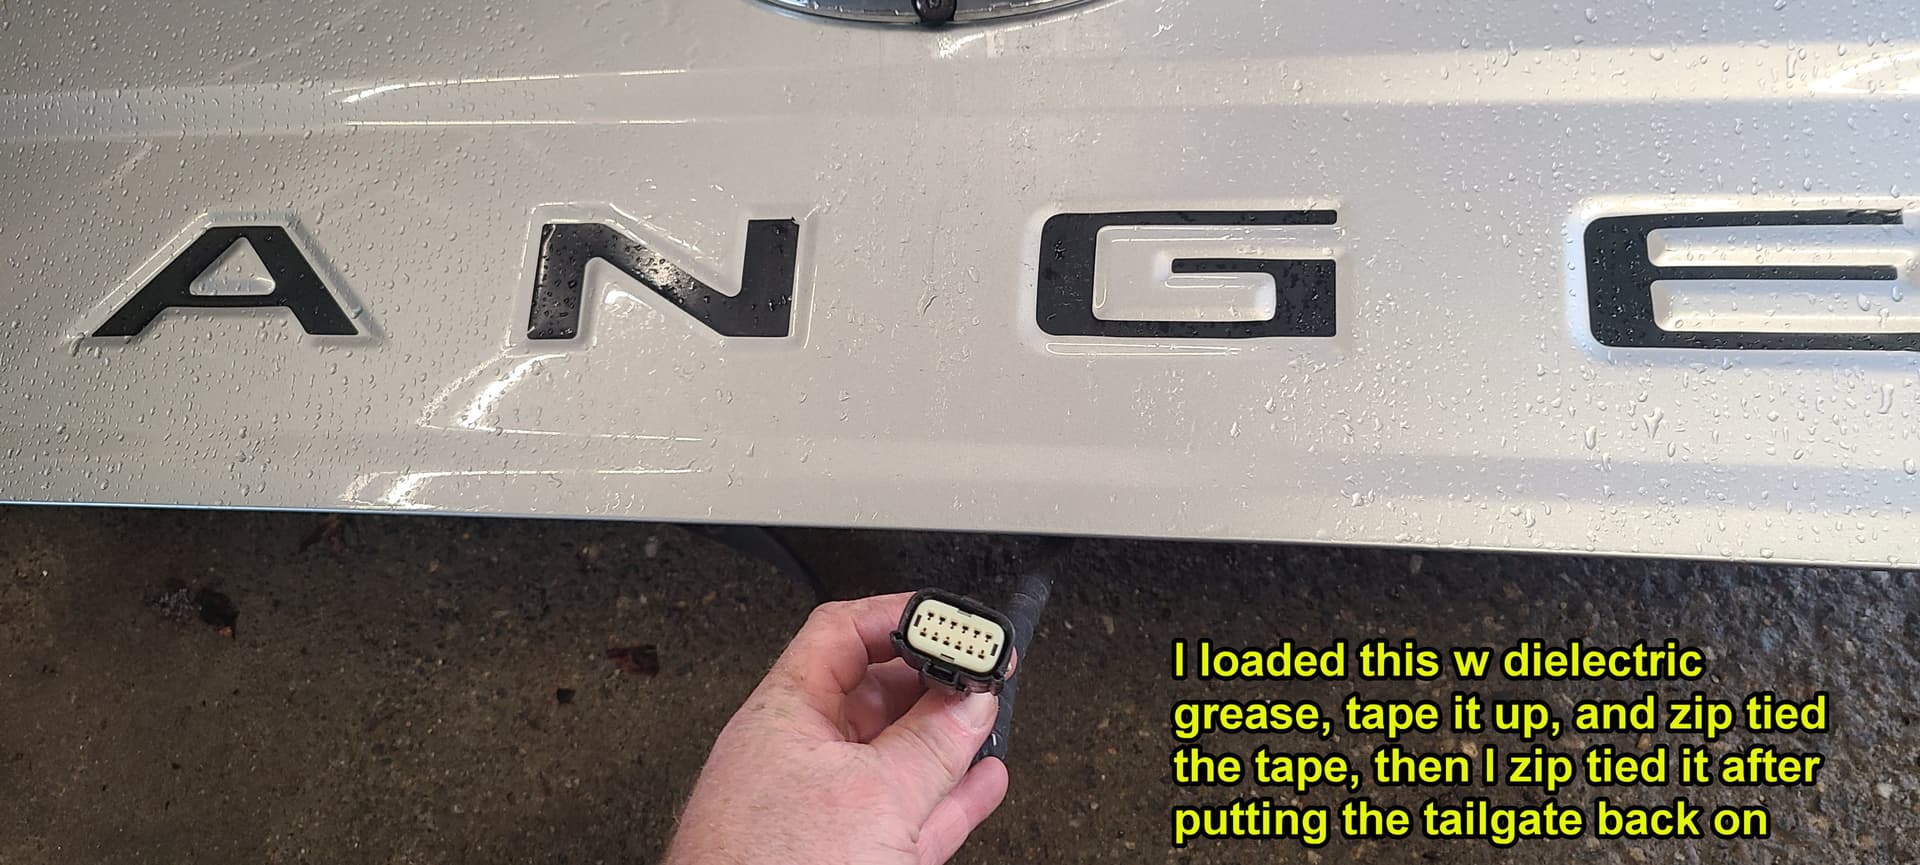
you leave the OEM camera in place in the tailgate, just coat the connector with electric diode grease and wrap it up to protect it, just in case you want to use it again. One Downside, my tailgate autolock no longer works. Be warned, the rostra camera image quality is not as nice as the Ford OEM camera, but it’s good enough so you don’t back into anything, and it’s still helpful for backing up to a trailer.

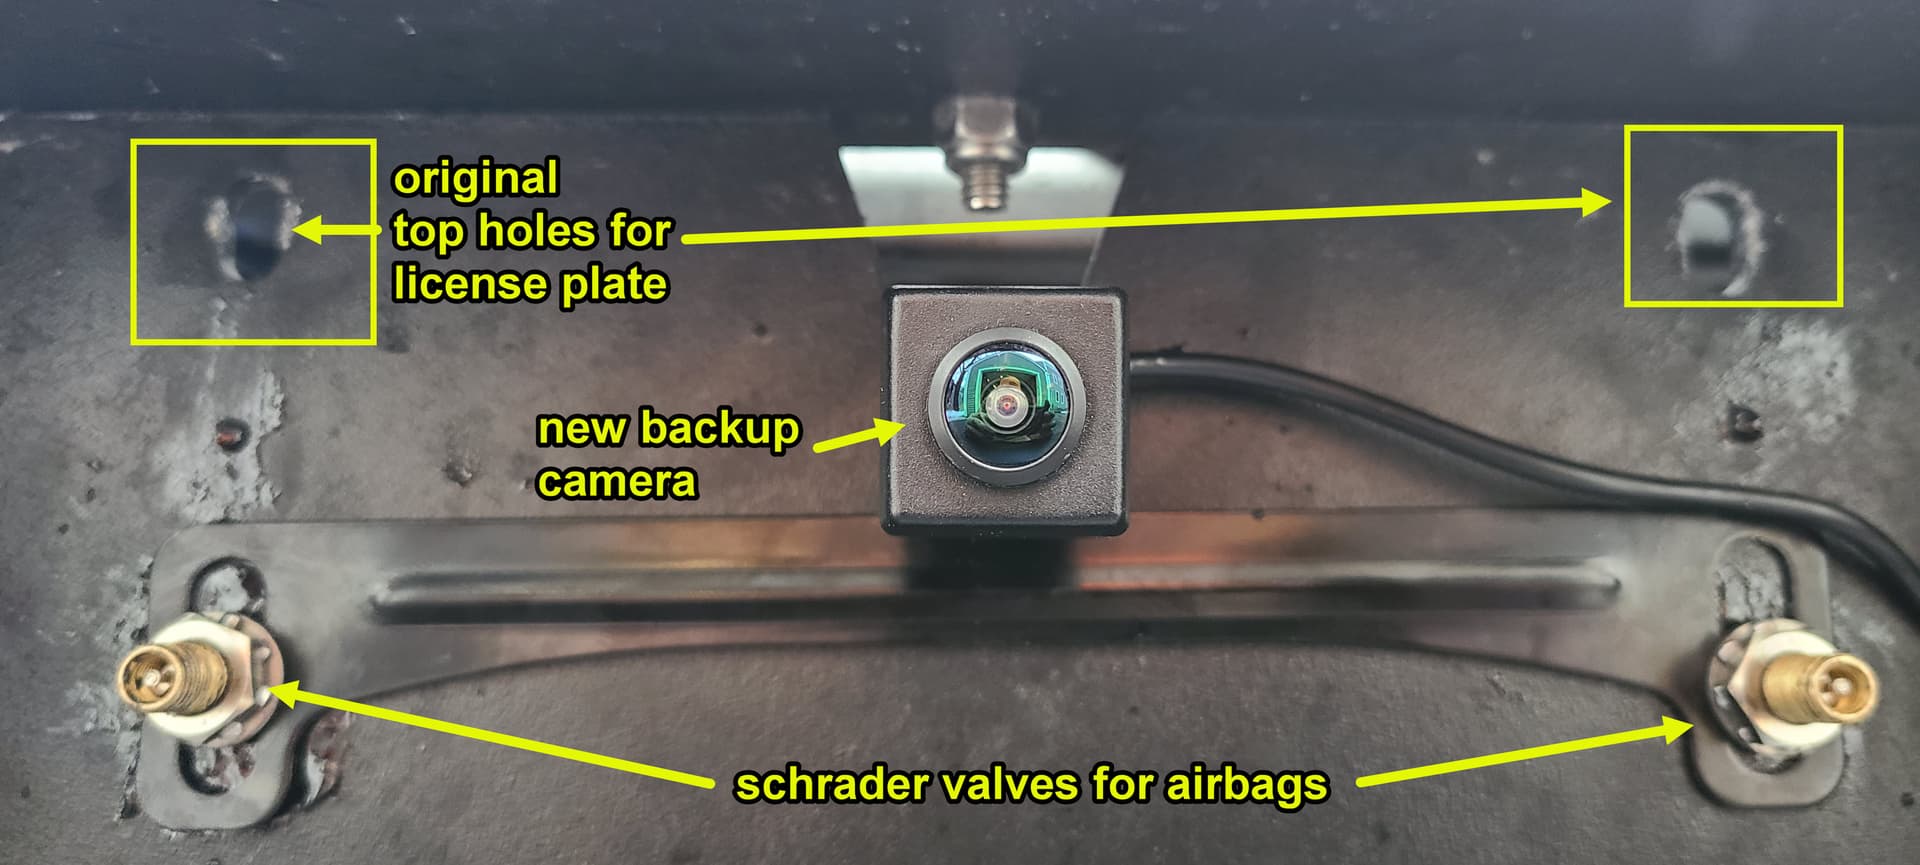
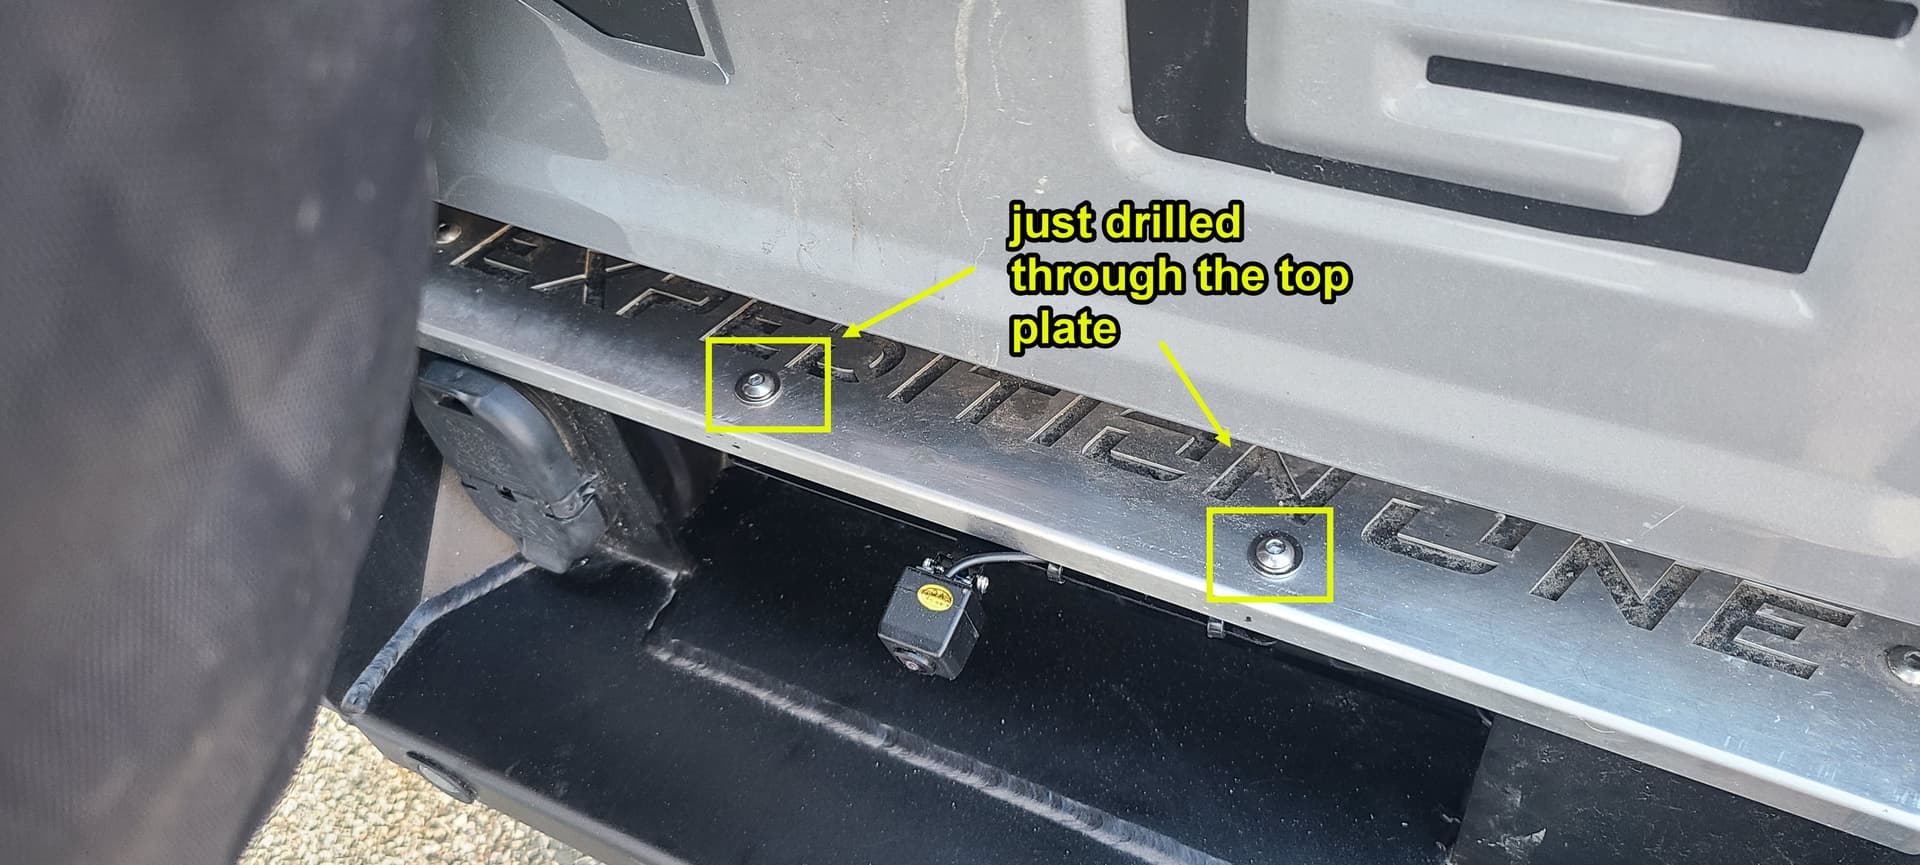
My builder had originally put the shrader valves in the license top hole spots when the license plate was in the bumper recess, but the stainless top plate thing made it a pain to reach those valves, the lip felt sharp on the back of my hands. So with this reshuffle, I was able to move the valves down where they’re easy to reach, get the license plate to a more visible spot, and get the backup camera below the tire.

Btw, I had to move the backup cam to the top lip, because it was shaded in that recess. In the daytime, the image was super bright and washed out, making it hard to see anything. Ironically, that stainless top plate that was annoying with the original air bag valve location, was perfect for moving the camera.

More photos on my website here.

Key photos