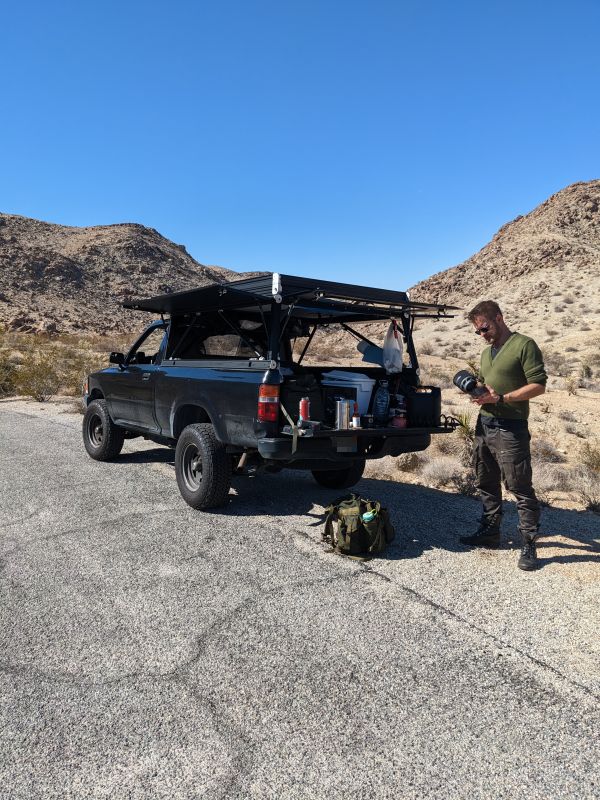
Went out for a trip this weekend. It was so freeing to simply park on the side of the road and make fresh coffee for two before hitting a trail. On return from the trail, it was a pleasure to cool off on the tailgate under the shade of the cabana panels. A+
I discovered a few more needs that must be addressed:
A small garbage can with a latching lid that can be secured
My rear window was covered with a piece of cloth held in by magnets and it’s a hassle
I want to put some retroreflective tape on the GFC to make it visible to headlights at night
I want some red lights in the bed so I don’t trash my night vision
I had an attempted break-in in a Dollar Tree parking lot (fortunately caught by my car alarm). I need some kind of small secured space for items like cameras and documents
Not sure how this thread isn’t getting a ridiculous amount of love, but a bunch of us in-house have been ogling over the build and all your rad R&D. Pinning this to the top of the category for a bit.
I’ve mentioned lighting a few times in this thread. This will be the lighting post. First of all, I’m an optomechanics guy by trade, so lighting is very important to me. Quality of light matters to me.
This means good color rendition - at a bare minimum, 90CRI emitters
This means dimmable - nothing worse than inappropriate levels
This means absolutely no camera artifacts or flicker
I chose a [BuckPuck driver]( BuckPuck DC LED Drivers -). “Buck” drivers reduce incoming voltage to match the LED requirements (so 14.4->12v would work). “Boost” drivers raise incoming voltage. So if you wanted to power from USB or something less than 12V, you’d need boost. This specific driver solves the flicker issues found in cheaper drivers from Amazon, and also gives me dim-to-off capabilities. There’s still a sharp knee where the LEDs turn off early, that’s unavoidable when there are integrated current limiting resistors (basically all “12V” strips). For these strips, I got the 1A model with a 5K pot and 7 pin SIP connector.
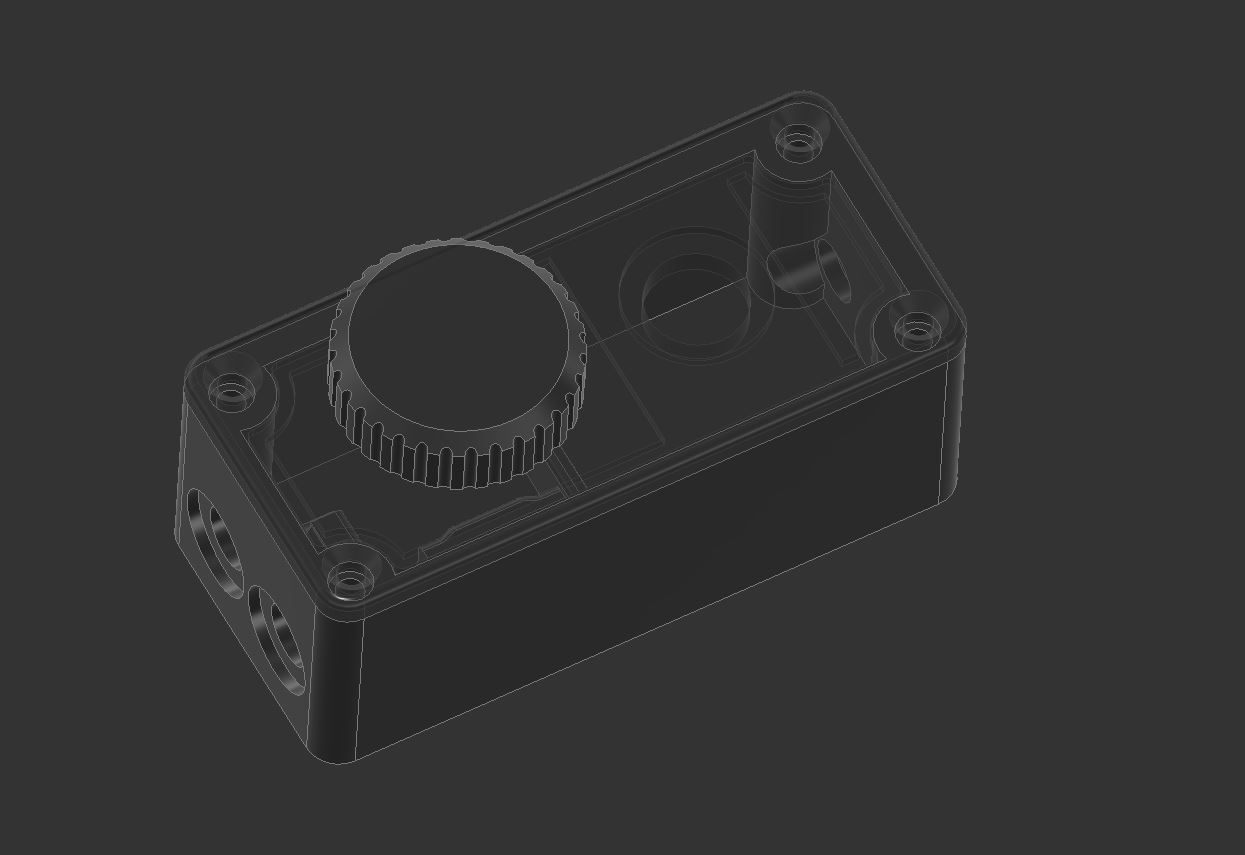
Whipped up a quick prototype enclosure. Needs work but it’s simple and looks good. A big priority for me is positive feedback from every system. In this case, I wanted the switch to be easy to find in the dark and to give very clear feedback that it was pressed. That meant a guitar pedal switch for a maximally satisfying click.
You can see that the BuckPuck really gives you a lot of flexibility with power. I’m using a Milwaukee M18 battery for prototyping, getting a couple hours of runtime at max brightness.
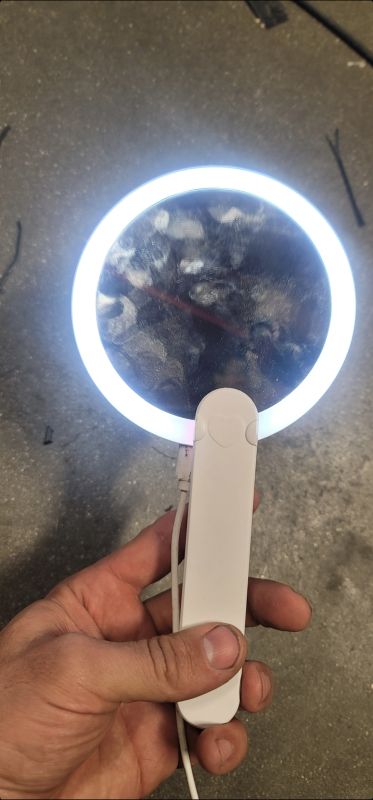
Nice. I think it’s good practice, generally, to try lower cost and simpler solutions first. My camp light for the first four camps was just this little lighted makeup mirror . I cut the butterfly wings off the handle, but it still has a little heart molded on it. I’d have kept using it, except that it switches itself on sometimes and kills the battery. I have good flaslights and stuff too, but the folding handle made it really convenient for hanging around the camper. Anyway, a nice, cheap, simple solution can last a long time, and teach you about what’s important. And of course, never underestimate the staying power of a temporary fix
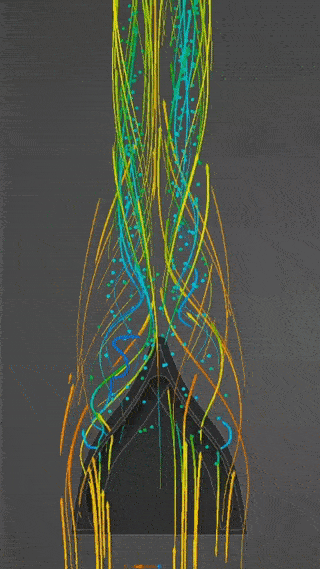
(my simulation of an AirTab-like vortex generator)
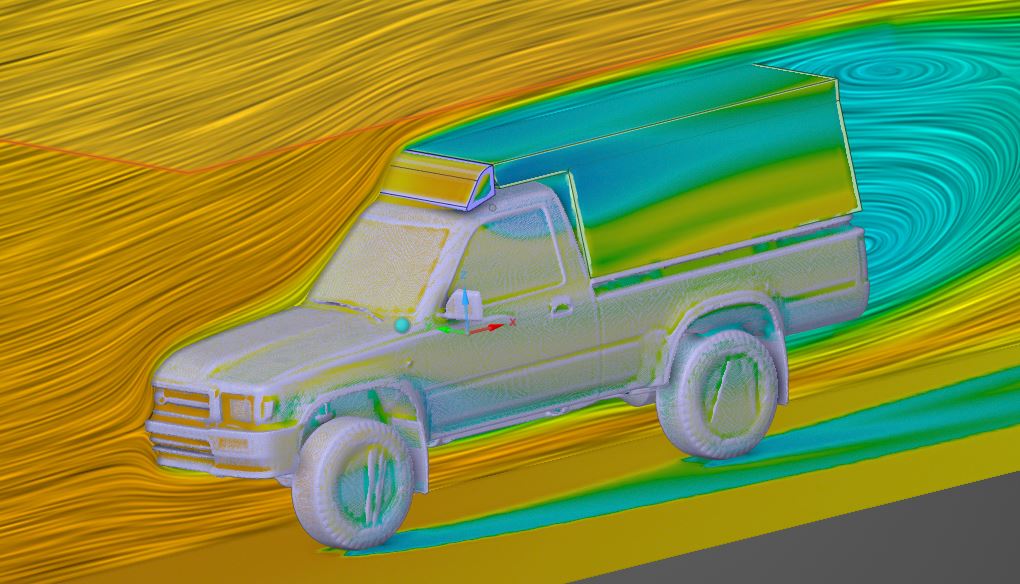
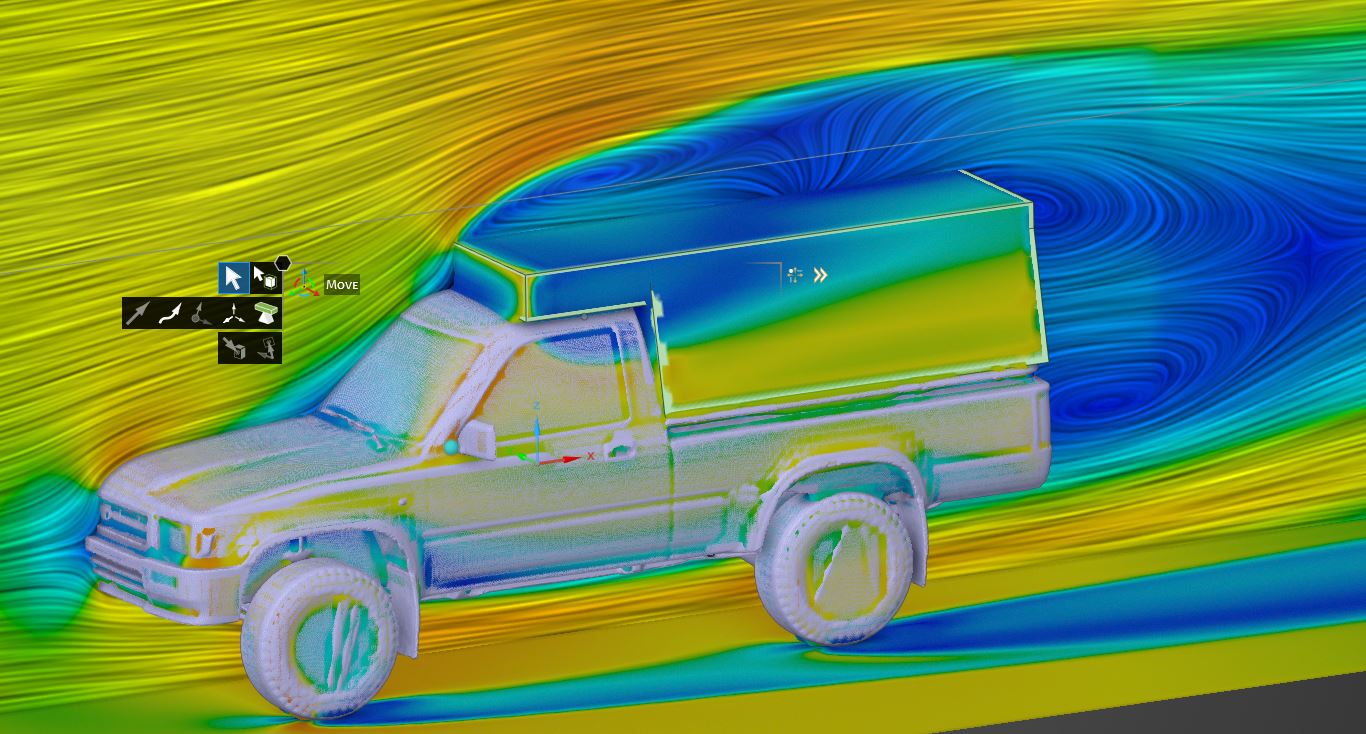
I’d like to explore options to reduce wind noise, back pressure, and buffeting, as well as potentially see some small gas mileage gains. My restrictions are that I don’t want to make the GFC look bubbly, add a bunch of weight, or change the look too much. Let’s be real - it’s a dashingly handsome slap in the face of aerodynamic conventions and I love it that way.
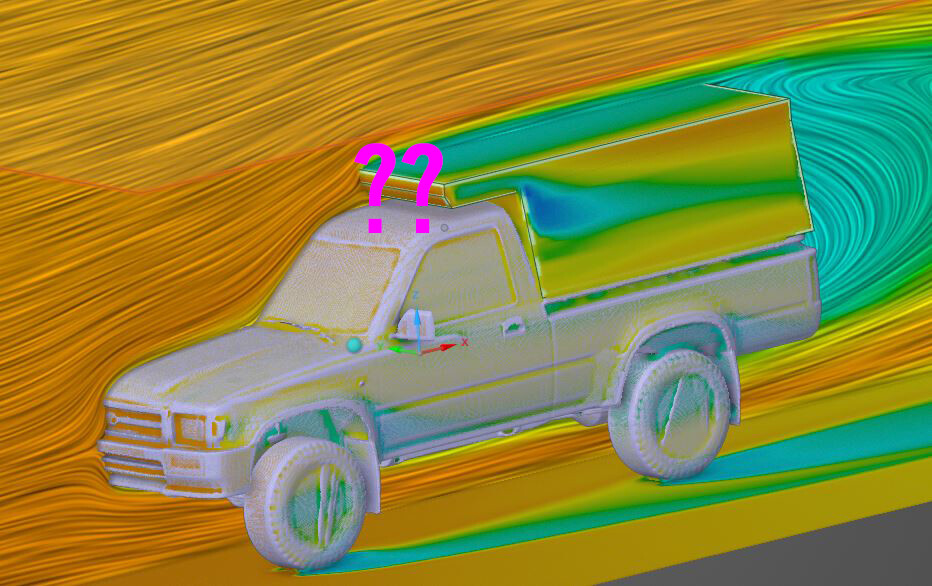
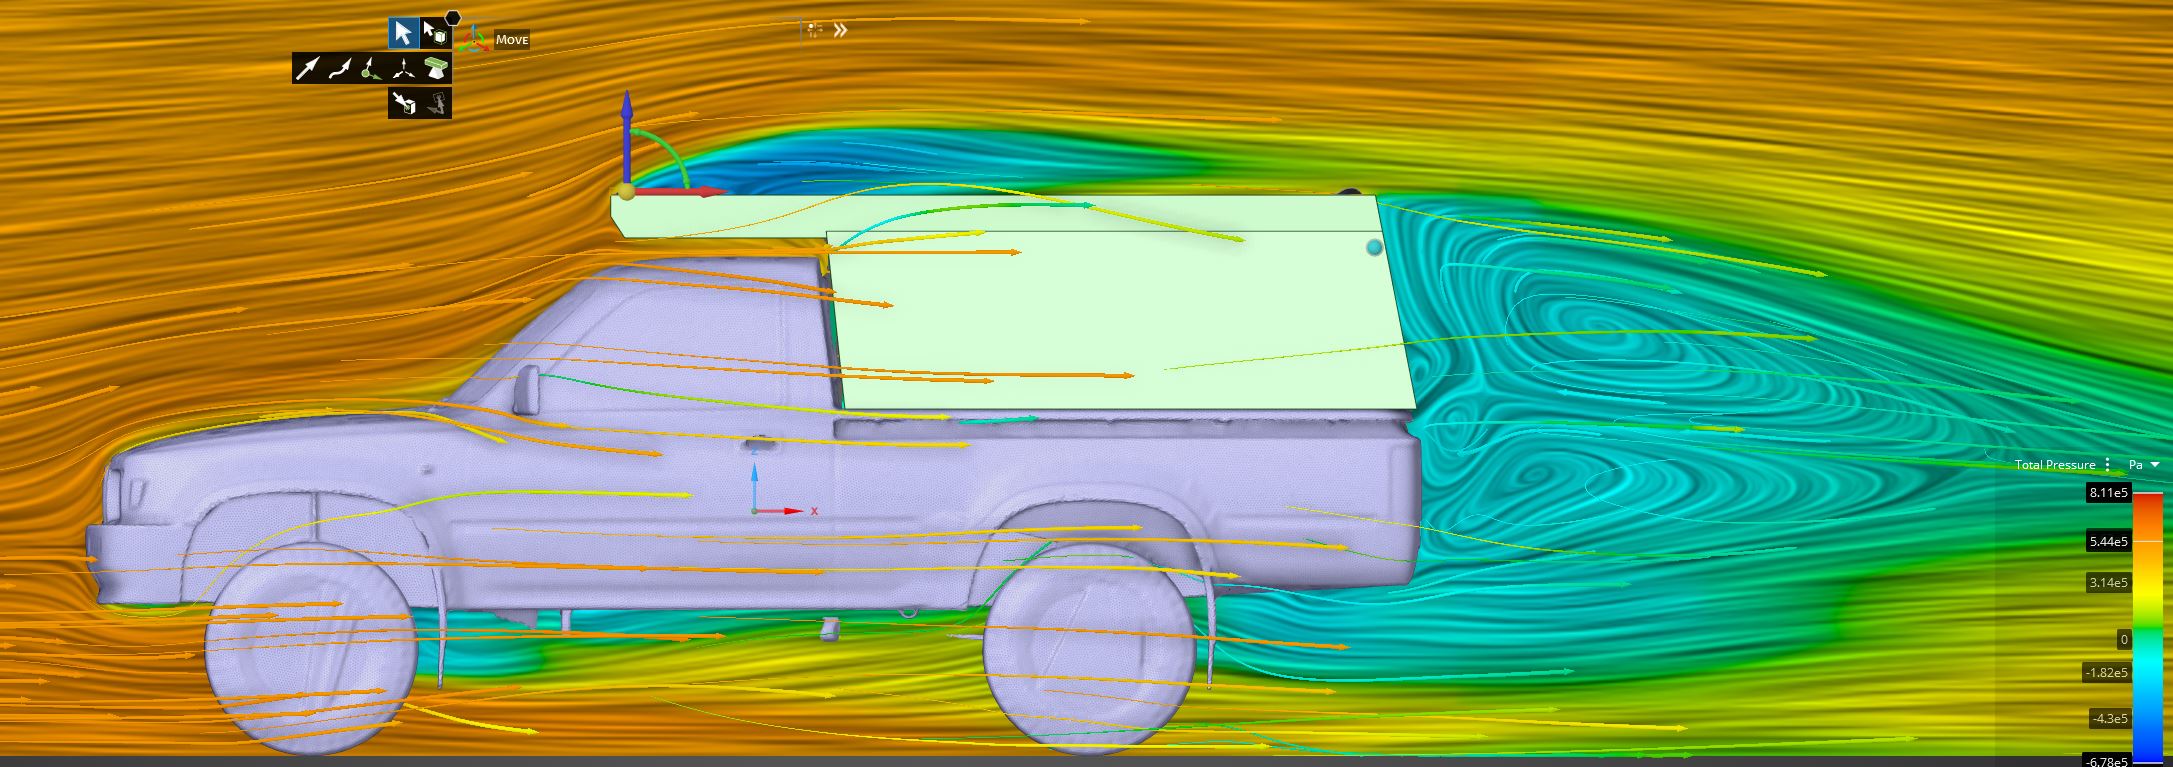
From my experience and early simulations, it appears there is a high pressure zone that forms between the cab and upper portion of the bed. When I’m driving 65MPH+, I can look behind me in the cab and see small but significant fore and aft movement between the rear window and the camper window. I’d like to reduce this as much as possible. Today I was reminded that drag increases as the square of the speed- which is why we don’t feel it in city driving, but highway driving, where you should be getting your best mileage, is deeply impacted. Twice as fast - four times the drag.
I see three potential avenues of attack.
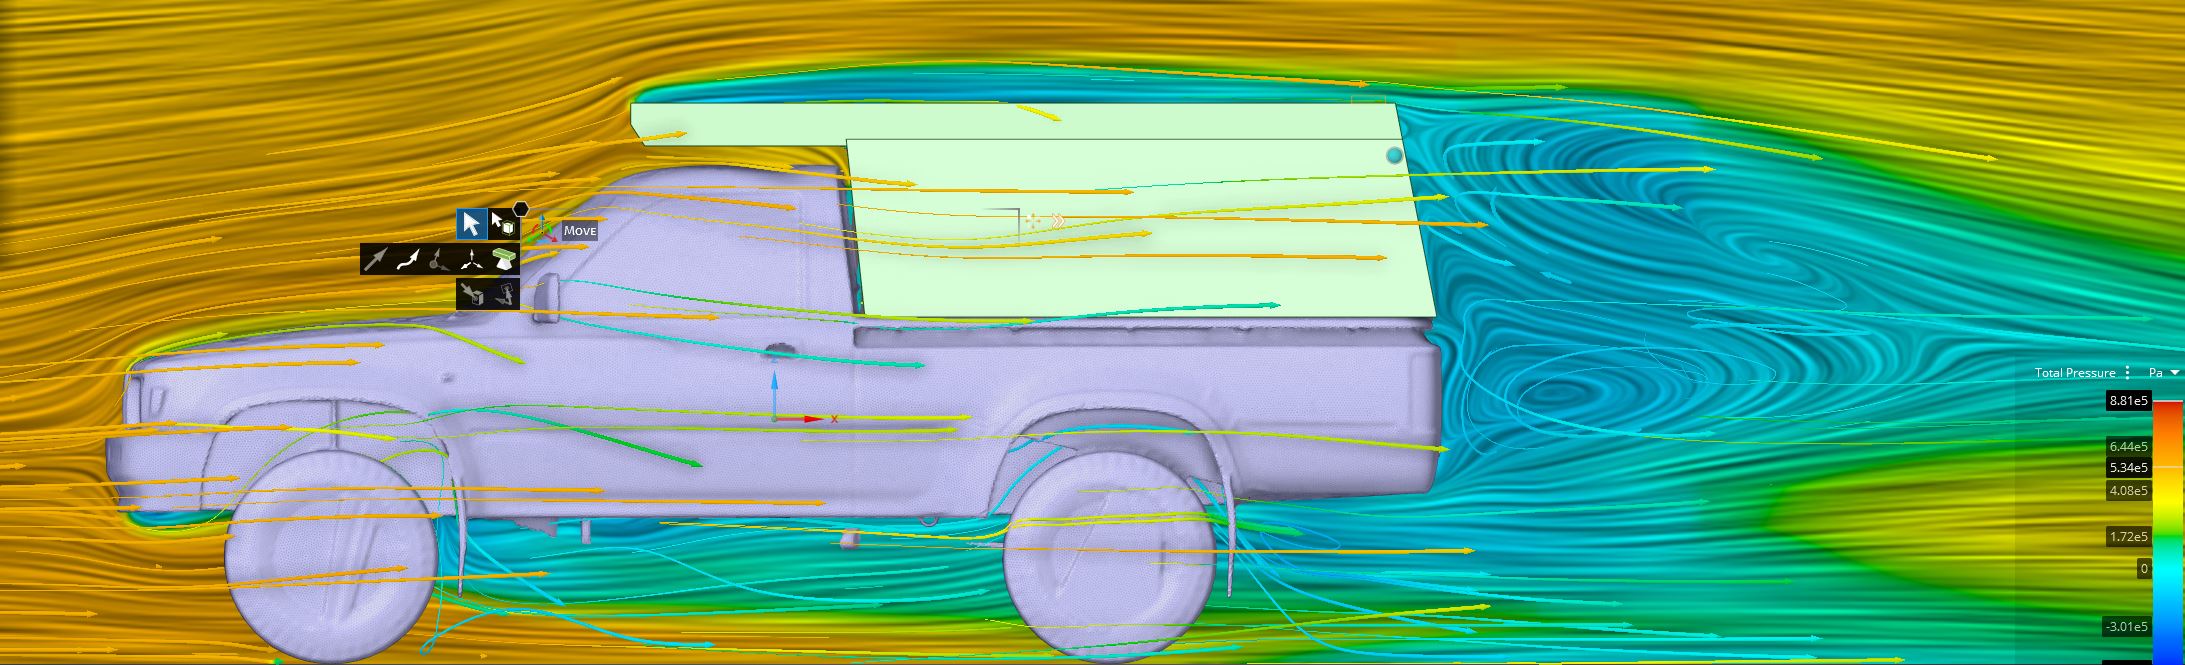
A fairing (but probably compound curvature based on the NASA results above)
(in these test sims the GFC is not accurately modeled - will have to fix that as things get more serious)
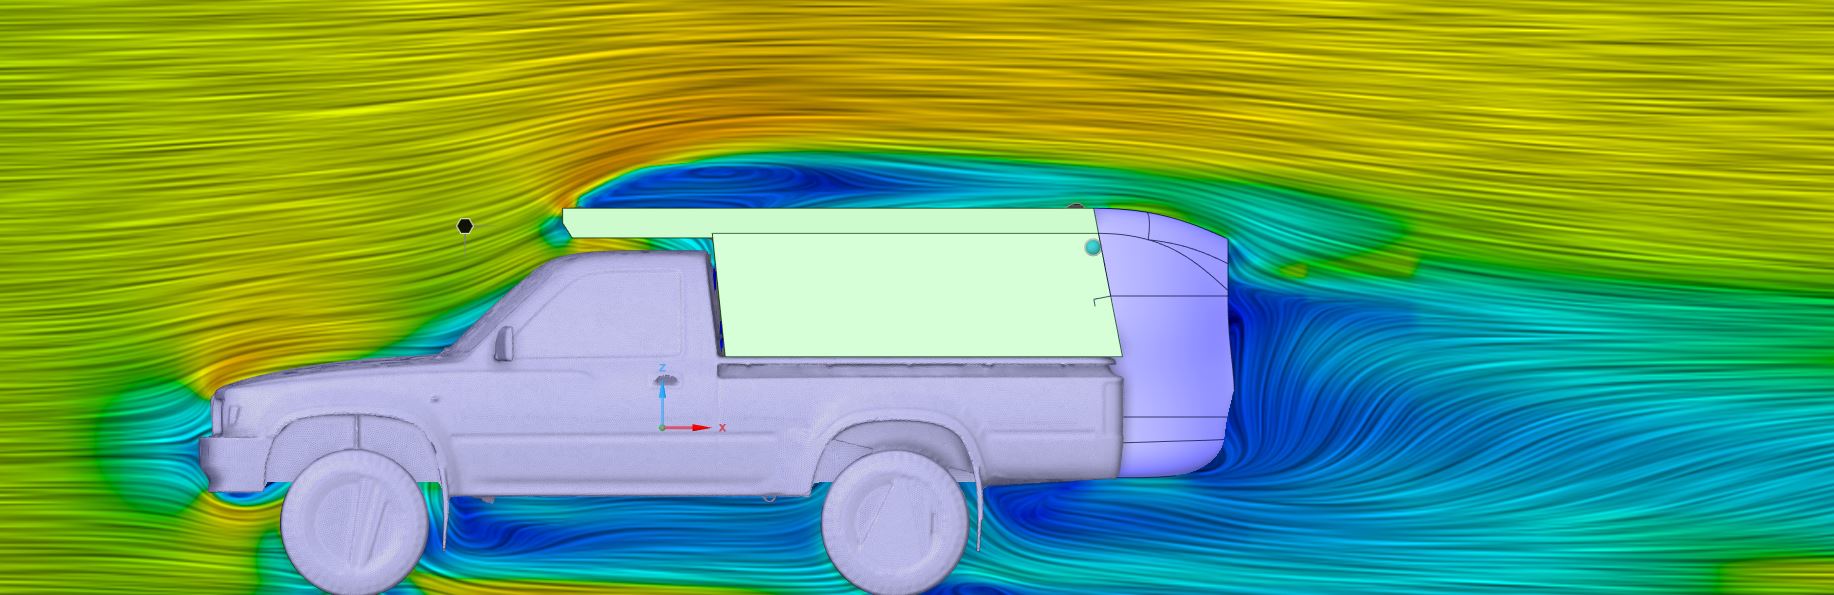
Low fidelity look at vortex generators. I don’t quite have the resolution or the model setup to evaluate them properly right now. No vortex generators VS a line of vortex generators on the trailing edge of the roof:
I put air tabs on a class c motorhome and on a travel trailer and they worked out pretty well. hard to know if the milage was improved but the handling was certainly improved
Very cool - glad to hear that personal experience. I’m enjoying all this research & simulation, but a big part of me wants to just buy an Airtab kit and go ham on it.
I woke up this morning with a new thought slapping me on the forehead. I’ve been very focused on the cab/camper area, but just look at the pictures I posted. There’s a huge, unmistakable low pressure zone behind the truck where the boundary layer of air is separating and flow is even reversing. I mean, it’s like half of what’s on screen. Seems like a better place to start, and airtabs/vortex generators are exactly the solution there.
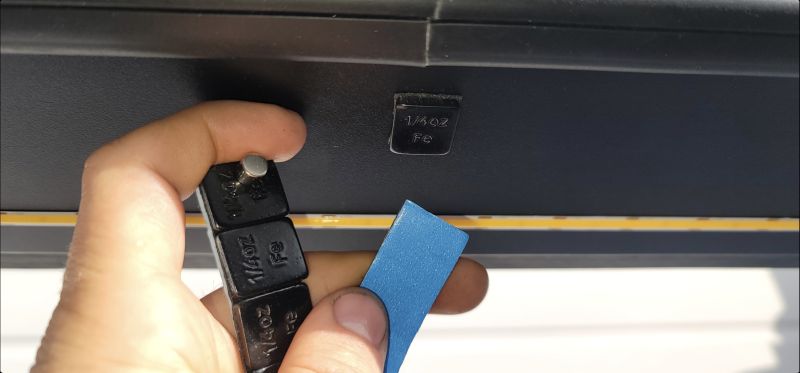
Wanted to share a low cost hack that’s been working well for me. I had a box of these steel, stick-on tire weights. They make great add-on magnet mounts wherever you need them.
I get my magnets from KJ Magnetics. N52 grade are the strongest but not always the best value for the money. Most sellers on Amazon claim N52 but they are absolutely lying.
I used them on my rear window to hold a piece of cloth in place. I plan to make a foldup rear window cover.
Has anyone suggested OnX Maps to find BLM and other area info? They’re a startup out of my hometown of Missoula, MT, and most of us here at GFC swear by the app. It’s constantly updated, and their recent entry into the backcountry skiing space shows that they can iterate to success quickly.
The off-road app is likely what you’ll want to look into, and the overall features are solid from planning to recapping your trips. Plus, it’s 30% off until 2/25.
Thanks - hadn’t tried it yet, but just subscribed.
I’m a complete n00b to these apps. My observations:
Google Maps is almost exactly the wrong thing. Doesn’t navigate when offline (even if you’ve downloaded offline maps) and is generally way too focused on point-to-point navigation to commercial and residential addresses.
iOverlander is the king of simple, but also not very deep. I opened it up, pointed at an area, and saw a list of dispersed or unregulated sites. That was nice given that I did not have a lot of time. However, the data were not up to date, several sites that I drove past were closed.
GAIA seems to be best suited for desktop planning. It’s a map-lovers app with insane depth in maps. I bought the premium app. I was annoyed that much of the map symbology seems opaque - I need to look up how to show a key to some of the color/stripe coding going on. There’s obviously an art to using it.
Some of the overlanding stuff might not make a ton of sense for a RWD rig, I need to kind of learn the off-road boundaries&capabilities of my vehicle.
Anyway thanks @Thayne , I signed up for the lower tier of off-road OnX and will see how it feels/works. I’m happy to pay for things (especially American made/homegrown stuff) but really hate upsells, in-app purchases, and constant subscription nags, so we’ll see how that goes with all of these apps.
I used to spend my summers in Sidney, MT, BTW. Originally from the Dakotas. I miss the thunderstorms and quality meat markets more than I can say.
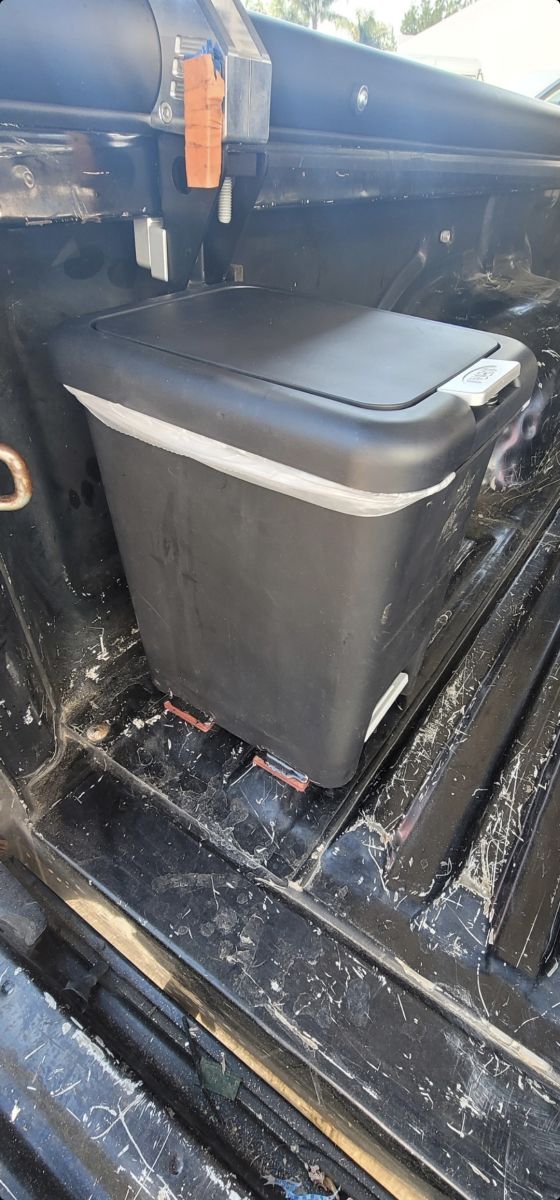
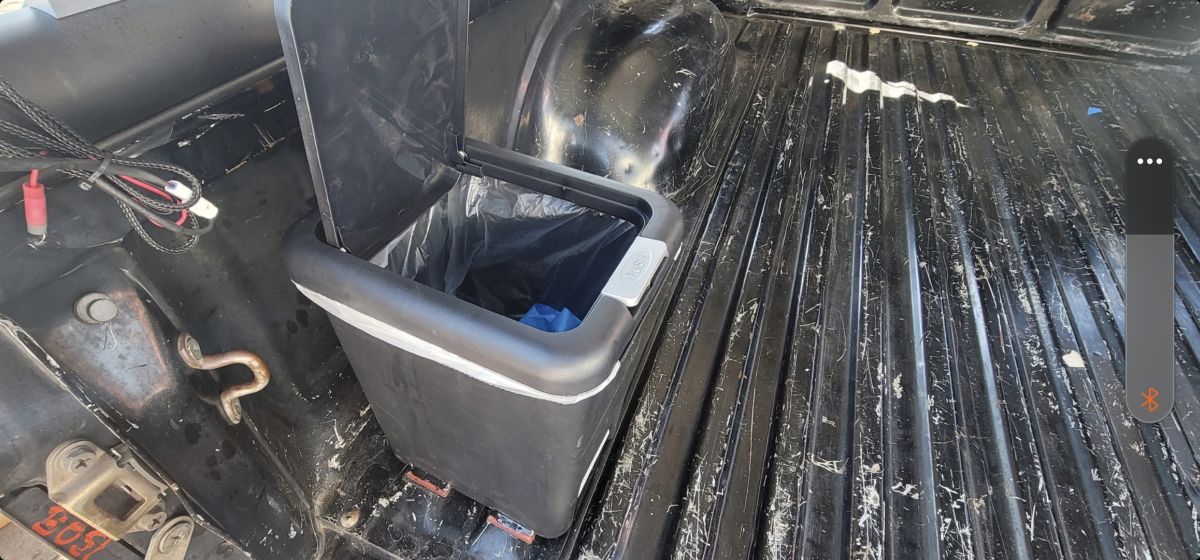
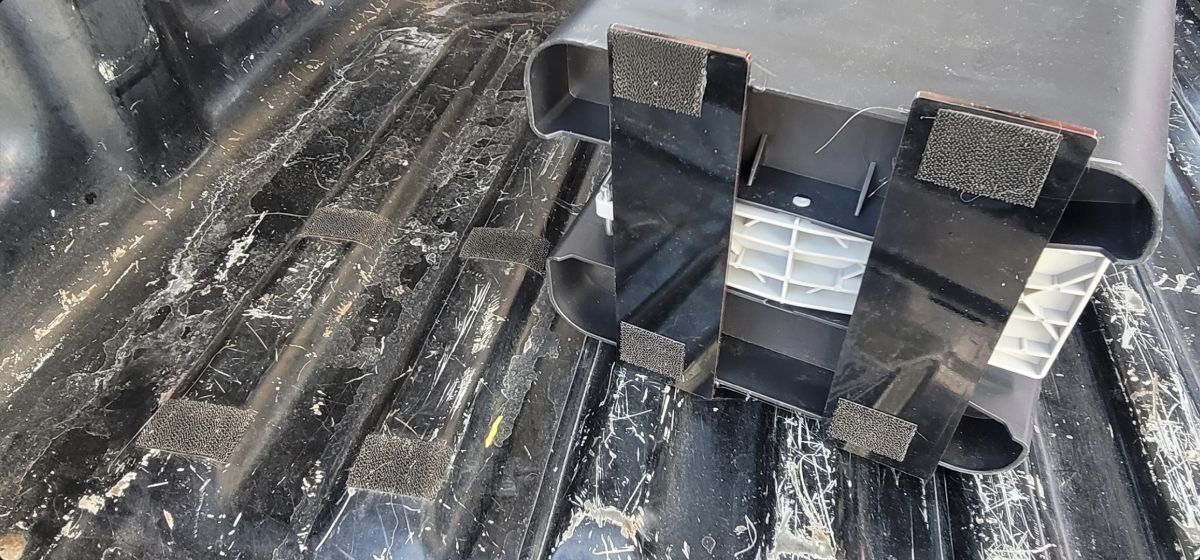
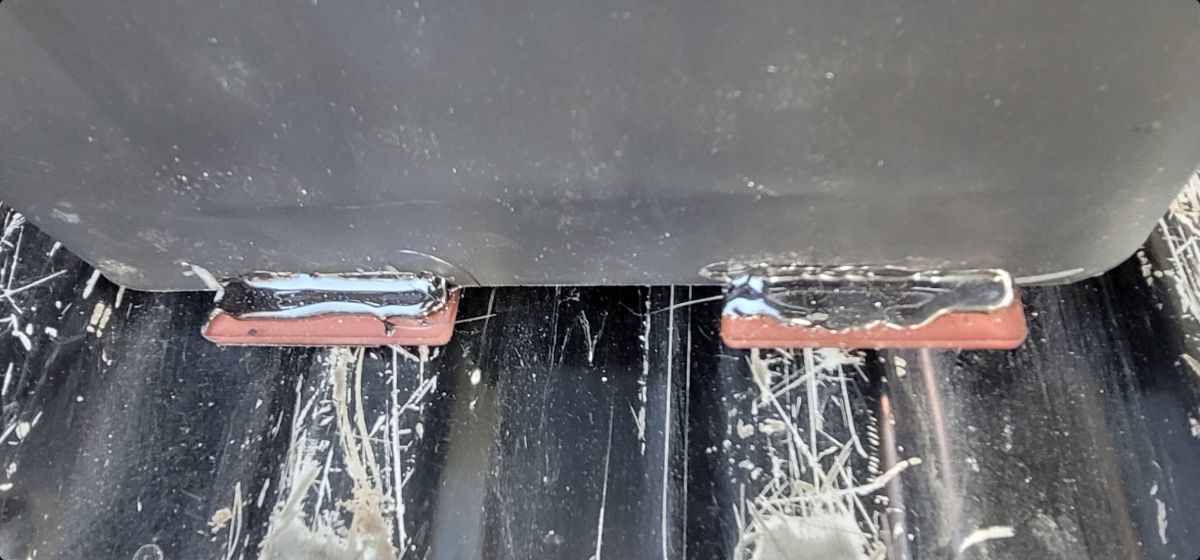
I wanted a small, unobtrusive garbage can with a lid. I couldn’t decide exactly where I wanted it. I ended up getting a $5.99 plastic can from Dollar General, and hot gluing plastic strips to the bottom. On those strips, I added 3M dual lock snap velcro. Now I can reposition the can wherever I want, easily remove it for cleaning, have multiple mounting points, etc.
I’ll be camping in the GFC again this week so I’ll be testing this out and see how I like it.
UPDATE: It’s a keeper. This garbage can was basically just enough for two days worth of cooking waste. I love the location and the locking lid. Another great, cheap win.
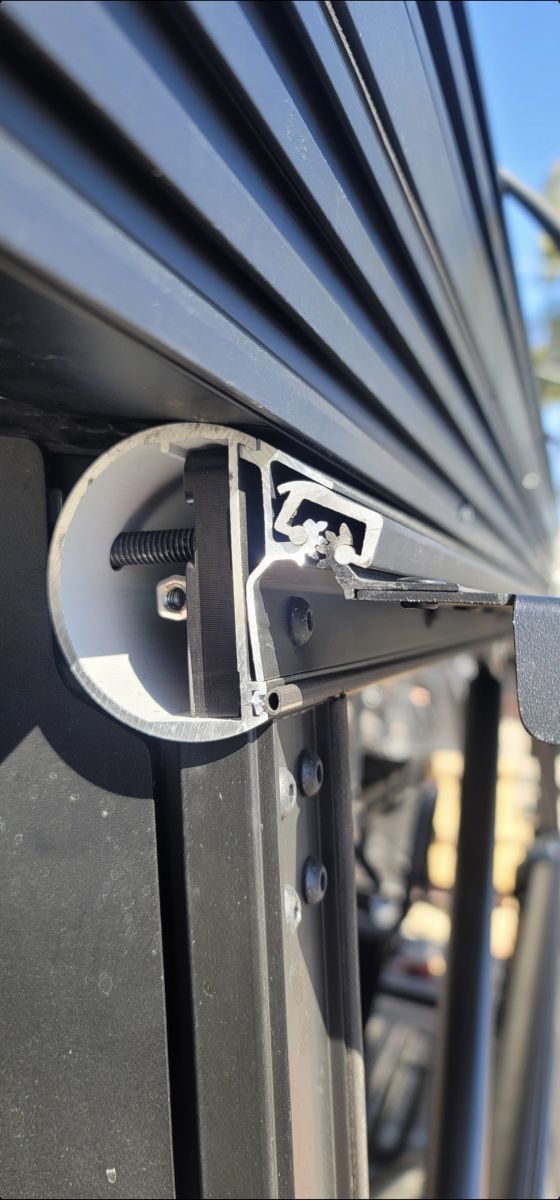
One of the issues I’m facing (EDIT: Support ticket filed) is that when my panels are open, they’re exactly at eye height. I’ve smacked my head more times than I can count. Once hit my eye socket pretty hard. I think this is specifically a small truck issue.
I’m 5’10"+
From the ground to the panel where it connects to the hinge is 67.5"
The panels open just barely over 90. The rear one slightly less than the sides.
Looks like my panels are about 1.5 degrees “UP” from 90
My question is: Can the hinges tolerate being opened a few degrees more? I could literally redo the strut mount brackets to fix this in an hour, I just want to be sure I’m not going to put undue stress on the hinges.
Anyone can use the code “trailguide30” for onX Offroad to get 30% off of a subscription year round.
Disclaimer: I’m part of their trail Guide program but receive no incentive or commission for anyone using that code. It’s just a discount they made available for us to share with everyone and isn’t tracked to any single person.