My apologies if you have already answered this, would you mind sharing a couple of pictures of how you ran the solar wiring inside? I get our camper installed July 30th and I am trying to accumulate all the parts and everything I can prior, I really like how clean this is, I am trying to keep the exterior as clean as possible. Great build!
Thank you very much and no trouble at all. Let me look back and see if that part is documented…I do. That part of my build is right here.
It looks like I didn’t document the holes I drilled. But I think that part is pretty straight forward. The clear RTV ends up staining a bit, so there may be better options to keep the look clean.
If you need more pictures let me know, or if you need the parts that I ordered let me know.
Thanks so much, I saw those and since have ordered a couple different to see will work best for my application, I was just curious how you were running the wires once inside the tent to keep things clean and organized. I still need to use my truck as a truck sometimes so I am trying to accomplish secondary power with a Goal Zero yeti but will keep all the wiring and panels permanent, if that makes sense.
1 Like
So I don’t have any pictures in my build process for the second camper. I do however have the first camper procedure for the upstairs portion here:
Then what I did with the lower section here:
On the newest build I did the exact same thing, the only difference is I tried using a cable loam instead of split tubing. Then used these black larger adhesive strap holders, but I don’t think they are very robust. So when you get your adhesive zap strap holders make sure you spend the cash.
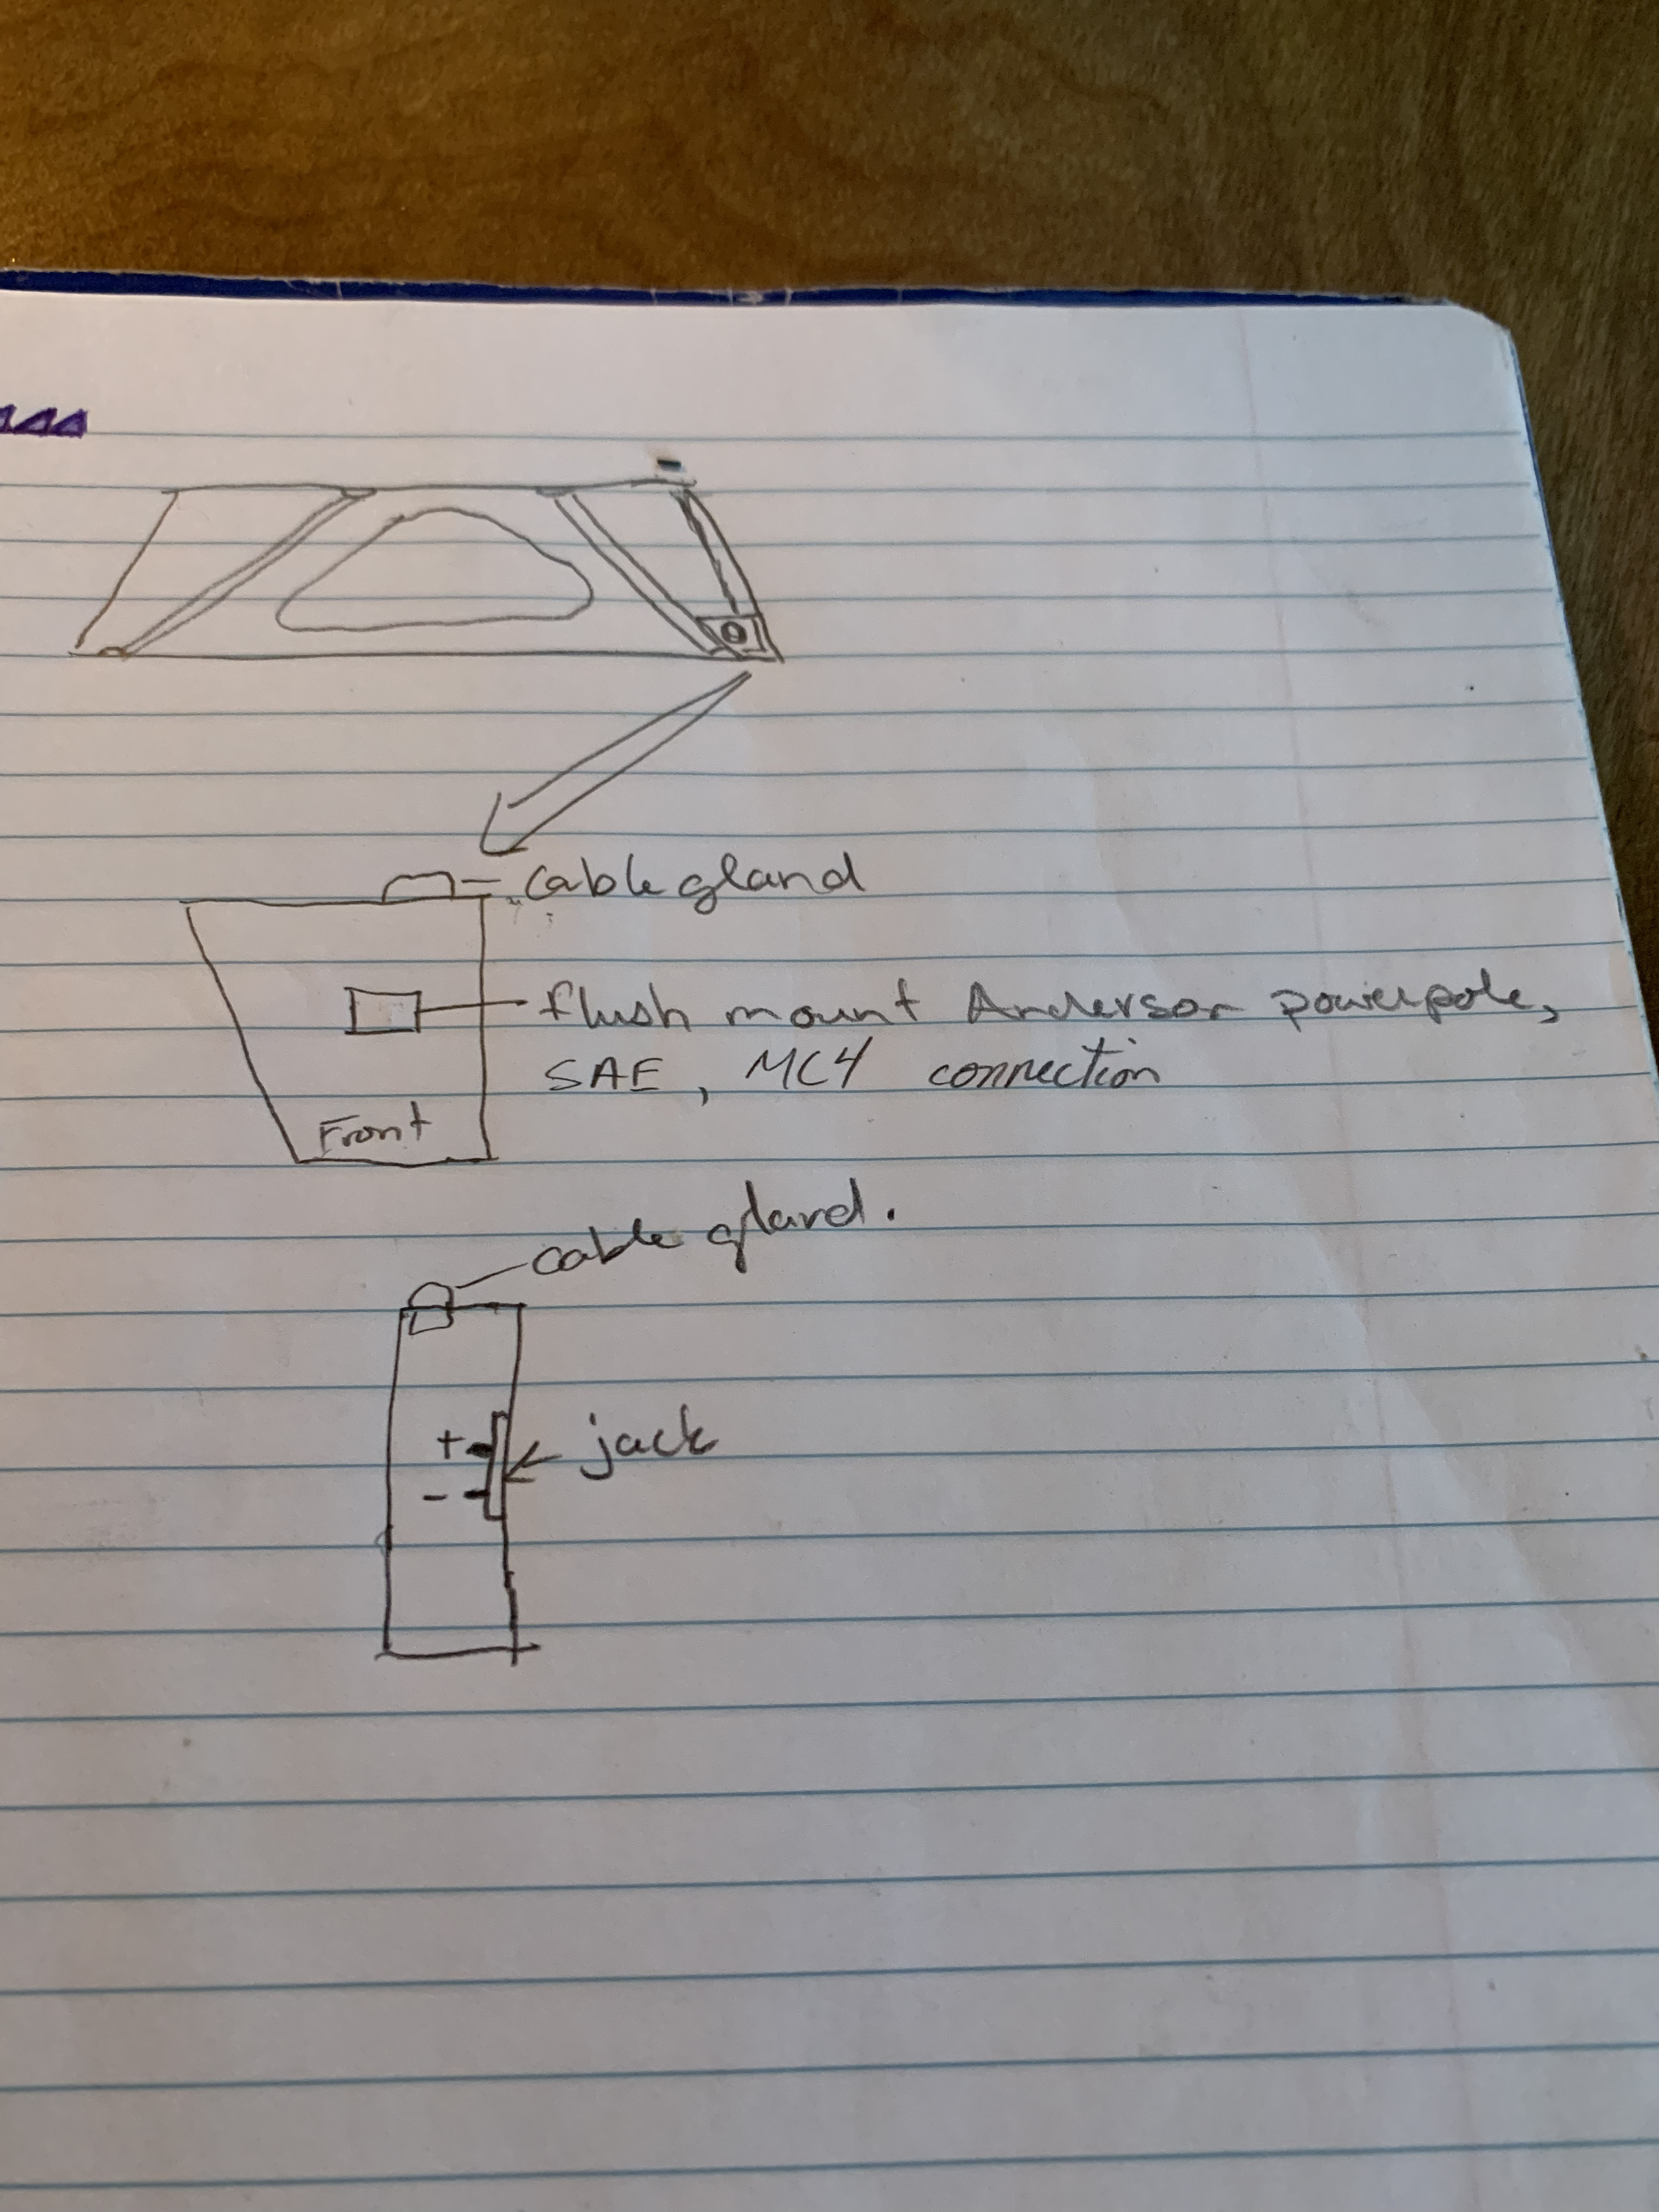
If you’re just connecting your goal zero, you can have your solar cables go to a jack then just plug and unplug as needed. If you know someone with a 3d printer, you may be able to get something printed that would mount on the front panel at the bar that has flush mount plugs. If that makes any sense. Let me rough sketch the idea here…it’s super to scale I used a beta version of sketch-up:
2 Likes
Awesome man thanks! Great inspiration.
I recently shipped an aluminum extrusion framing cabinet via freight forwarding using XPO Logistics. I built a custom pallet/crate for the piece and it was very well protected. Between Renton WA and Michigan there were nine transfers. Long story short, the pallet and most of the surrounding crate were utterly destroyed when finally delivered. Luckily, the cabinet was not damaged, but its a miracle it survived intact.
I had previously shipped the same cabinet with the same pallet/crate using Fedex Freight with no issues whatsoever. Prices between XPO and Fedex were comparable. I’ll never ship with XPO again.
Packed before shipping:

2 Likes
Well lets get into what I did next on ‘Trigger’. I was never happy with how my brake pedal felt after doing rotors and pads. Also, it had become glaringly apparent that my e-brake was dragging as my fuel mileage had significantly dropped. So, I had time (not really, just an understanding wife and employer) to dig into the problem.
I started in the right rear and pulled apart the e-brake drum assembly which I hadn’t done since High School…which was a while back  Yup, that was the culprit, it was 100% dragging. Perfect, except everything was severely seized. I didn’t get any pictures because I was too into it. So it took a whole night to get both sides e-brakes freed up, lubed, and adjusted…a win


The next afternoon after work, my wife let me dig into finishing the job up because now all I had left was calipers, flush, and bleed. So I got to it. In the 2012 - 2018 Ram 1500’s the rear bake lines are all one piece. So the steel line to the flexible line is all one assembly. Unfortunately, the aftermarket parts I got on the right side did not come with a pre-bent steel line (The left side does because it’s shorter I guess). What did I do, I got a flare kit and cut the factory line and re-flared it. So that took a bit of time, but got it sorted. Got both the rears done and bled and the I could start to feel an improvement in the pedal but it was still not where I wanted it.


I then moved to the fronts and managed to get the one side done before dinner. Let’s see who can spot something off in this image:

If you guessed that I put the wrong side on (the bleeder is on the bottom)…you’d be correct. I didn’t notice this at first as I had felt I match these to my stock ones; but we’re all spread so thin these days that I must’ve gapped out and grabbed the wrong one. Needless to say, I carried on. I noticed right away when I bled the right front that the pedal went to shit. I just assumed it would get better when I moved to the left side. So I did…3 hours later I was out of brake fluid and could not find a reason that I had NO BRAKES. Clearly there was air in the system but I could not get it out.
After I sat in a dark room sobbing at my failure I had reached out to some wheeling buddies. They suggested that I may have my calipers upside down, I zoomed in on the picture and bang! That was exactly it. So I took Friday off (today) and swapped it all over. Now it’s all good, still not quite the pedal feel I’d like but it’s certainly better.
Here’s a shot of my eyewash bottle bleeder rig

3 Likes
Feel your pain…but then again, a correctly done DIY brake job can be extremely satisfying. Here’s what I found on one of my “pads” when I did mine:

Notice the lack of actual pad.
3 Likes
HA! I was looking at the picture and thought ‘WoW that is getting the most out of your pads’. The sound it was making must’ve been terrible!
1 Like
It was absolutely horrible. Interesting thing is that the other three pads (I only did the fronts) were just fine…worn but nowhere even close to this metal-on-metal situation. This was for a VW and I went with Zimmermann rotors and TRW Ultra pads. Could not be happier with the result.
1 Like
Attempt #3 of trying to keep the rear brake light and dome light working. After this, if it fails I’ll need to replaced the brake light because I’m out of wire to solder to. Seems like for me the way I have it set up, the constant opening/closing of the door is no match for the 20ga wire. Next go around I’m going to re-route the wiring to the door and see if that is better.


1 Like
What a bummer! I’ve ran out of wire to solder to before and its no bueno
1 Like
I’m having the same issue with brake light, haven’t tried sodering yet. Did GFC have any suggestions?
1 Like
I haven’t actually reached out to them. I replaced all the wiring that they did because I already had power run from my topper for a dome light and brake light. From what I can see the gauge of that wire coming out of the brake light is SO small that it just can’t keep up to the constant bending. Same with the dome light, which is about the same quality of Amazon junk. At list with the dome light I can pull it apart and re-solder a bigger gauge wire out of it.
2 Likes
That was totally my plan this go around, but I didn’t have enough Anderson Power Pole connectors  The other thing I was thinking of doing was putting in a door switch that would turn that dome light on as soon as you open the door.
1 Like
Learned a valuable lesson yesterday morning. Thought I would take advantage of the empty rec site and wind my winch under truck tension. At the time, I totally forgot I had my 40A DC to DC charger turned on…

Needless to say, pulling 35A to charge the battery, whatever current required to run the truck, and an 8k winch trying to pull a fully loaded Ram 1500 is more than 100A DC 
Pro-tip, carry spare fuses and don’t be charging your battery at the same time of winching. Time to research the full capacity of the trucks alternator.
3 Likes
So this is between your truck battery and the second solar?
I have a winch, but have only used it once or twice. I know my stock alternator is 130A. And my ANL fuse between the truck battery and DCDC charge is 30A.
Would it be best to disconnect that before winching?
Yeah this is the aux feed to my winch, dc charger, and ditch lights. My dc charger is key triggered, but I have a switch to turn it off. The day prior I was changing camps in the rain so no sun for the solar. I kicked in the charger and totally forgot.
Then in the morning when I hopped in I didn’t even think about it, but the switch was still on. The alternator is 220amps so I should be good there at least. But learned quickly that even though the 8k winch was a screaming deal. I wouldn’t count on it getting me out without some mechanical advantage like a 2:1.
I have a 100a and replaced it with a 150.
2 Likes
The last purchase that influenced the spending freeze, Starlink RV. In my current role all I need (like many) is internet to do my job. So gonna try this out, but I’m sceptical of it’s consistency in the central/northern interior of BC. The 30min burn it test drew about 3A or below. Service worked well in the driveway with no obstruction audit via the app. I ran it in the house on the roof for 24h with only 1min of outage time.

3 Likes
Ha funny I just sent mine back as it seemed too frivolous of a purchase, and I also decided to try to stop spending. Something in the satellite signal maybe?  . I was impressed overall though. Worked well even with some obstructions.
2 Likes