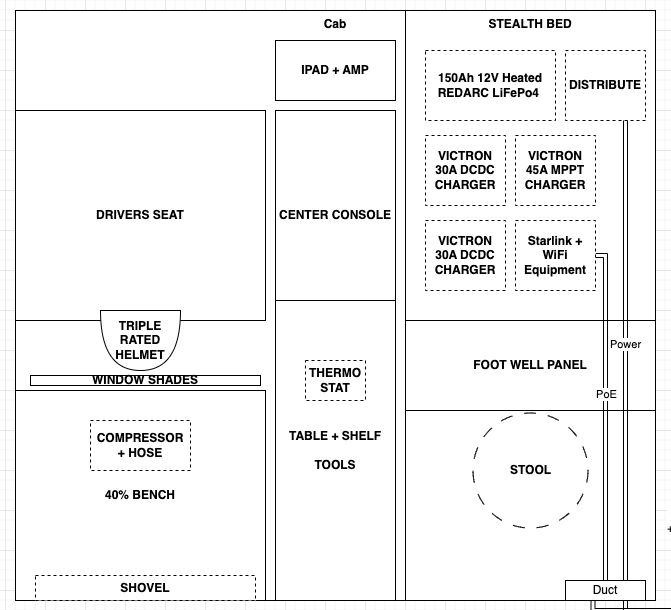
Steezemobile MK2 - Steezeman's Tacoma Build

I’ve spent the last month dreaming about MK2 of my GFC based overlanding rig. After almost selling it last month, I have been thinking about how to make this the best overlanding vehicle for my needs. I’m building this truck to live in next year, so the constraints look a little different than getaway/weekend warrior builds.

Here’s a photo of MK1:

Truck builds, especially mid-size, end up being a problem of many conflicting constraints, so it’s important to establish non-negotiable constraints, then develop priorities for everything else. Many conflicts between constraints can be solved with spending more money. Others require you to rethink other requirements that you assumed mattered.

I went through a phase where I thought a full-size was going to be my next build, but for a number of reasons I came back to the Tacoma, determined to make it work. This truck will be my home for months at a time, so I’m going to take my time and build things the “right” way - MK1 turned into a mess because I rushed it without enough resources (time, money) to do a good job.

Non-negotiable Constraints:

  • Based on my 2022 DCSB Tacoma
  • Based on my GFC V2
  • Needs to be comfortable in very cold (and snowy) and very hot weather, and have accommodations for getting work done on the road, both on a computer and on real truck projects.
  • Max GVW 6000 lbs, target 5800lbs fully loaded (added Mar 2024)

Prior requirements, removed Mar 2024:

  • Must weigh no more than GVW fully loaded with supplies and gear
  • Must be able to “stealth” sleep one 6’1" person without popping the tent
  • Needs accommodations for embedded electronics engineering while I’m on the road

More in the next post

7 Likes

Cab Design

Here’s the current design for the cab. I’ll break it down below, but first - let’s talk weight

Weight

It is well-known that almost all overlanding rigs based on the Tacoma are overweight. I already said in my first post that keeping under GVW is a top priority for me. Before I started designing anything, I weighed my truck. As I am designing and changing things, I am maintaining a spreadsheet with all the current additions and removals. Everything in my vehicle has to be optimized for weight to achieve my goal of keeping under GVW. The GFC is a good base because it is so light.

Screenshot 2023-09-23 at 5.25.36 PM

Seats and bed

I ditched all of the back seats in MK1. I don’t have a passenger very often - maybe once a month, and there is always a way around it. It’s a convenient fact that most people don’t think taking out their passenger seat is normal. If everyone took out their front seat, chaos would probably ensue, and how would anyone ever ride shotgun? My approach is more pragmatic - I have already removed my passenger seat, and when I am back in Utah next I will re-install the 40% bench seat. Now if I take a lady on a date, she can sit behind me and give me a back massage! Only upsides here.

In all seriousness, removing the 60% bench and the passenger seat open up a world of possibilities. Without this, sleeping comfortably in a DCSB Tacoma without popping the tent is not possible. As much as I love the orange color, it does attract a lot of attention when you pop the tent.

In this configuration, all of the passenger side of the vehicle can be turned into a bed, about 10" off the floor pan, and if I remove the glove compartment and the passenger side knee airbag, I have about 7 feet to stretch out.

Removing the unneeded passenger side seats probably saves me 100lbs.

Desk

The cab is better than the tent as a workstation when it is nasty out. I am an embedded engineer, so work often involves working with instruments that I’d rather not have exposed to the worst of the elements.

I plan to design a temporary desk that can go over the area between the center console and the door. A more permanent desk will occupy the space behind the center console.

When sitting at the desk, I will remove a part of the bed to allow my feet to rest on the floor pan.

Electrical System

The cab has turned into my workstation, and most of my larger electrical loads are located here too, so it seems like a good place to put the electronics.

When it comes to electronics, I used to cheap out and get Renogy parts, but I was always annoyed by the cheap build quality and the lack of solid documentation on communication protocols - I want to be able to interface everything in the system with a controller that I build myself - more on that later.

Chargers

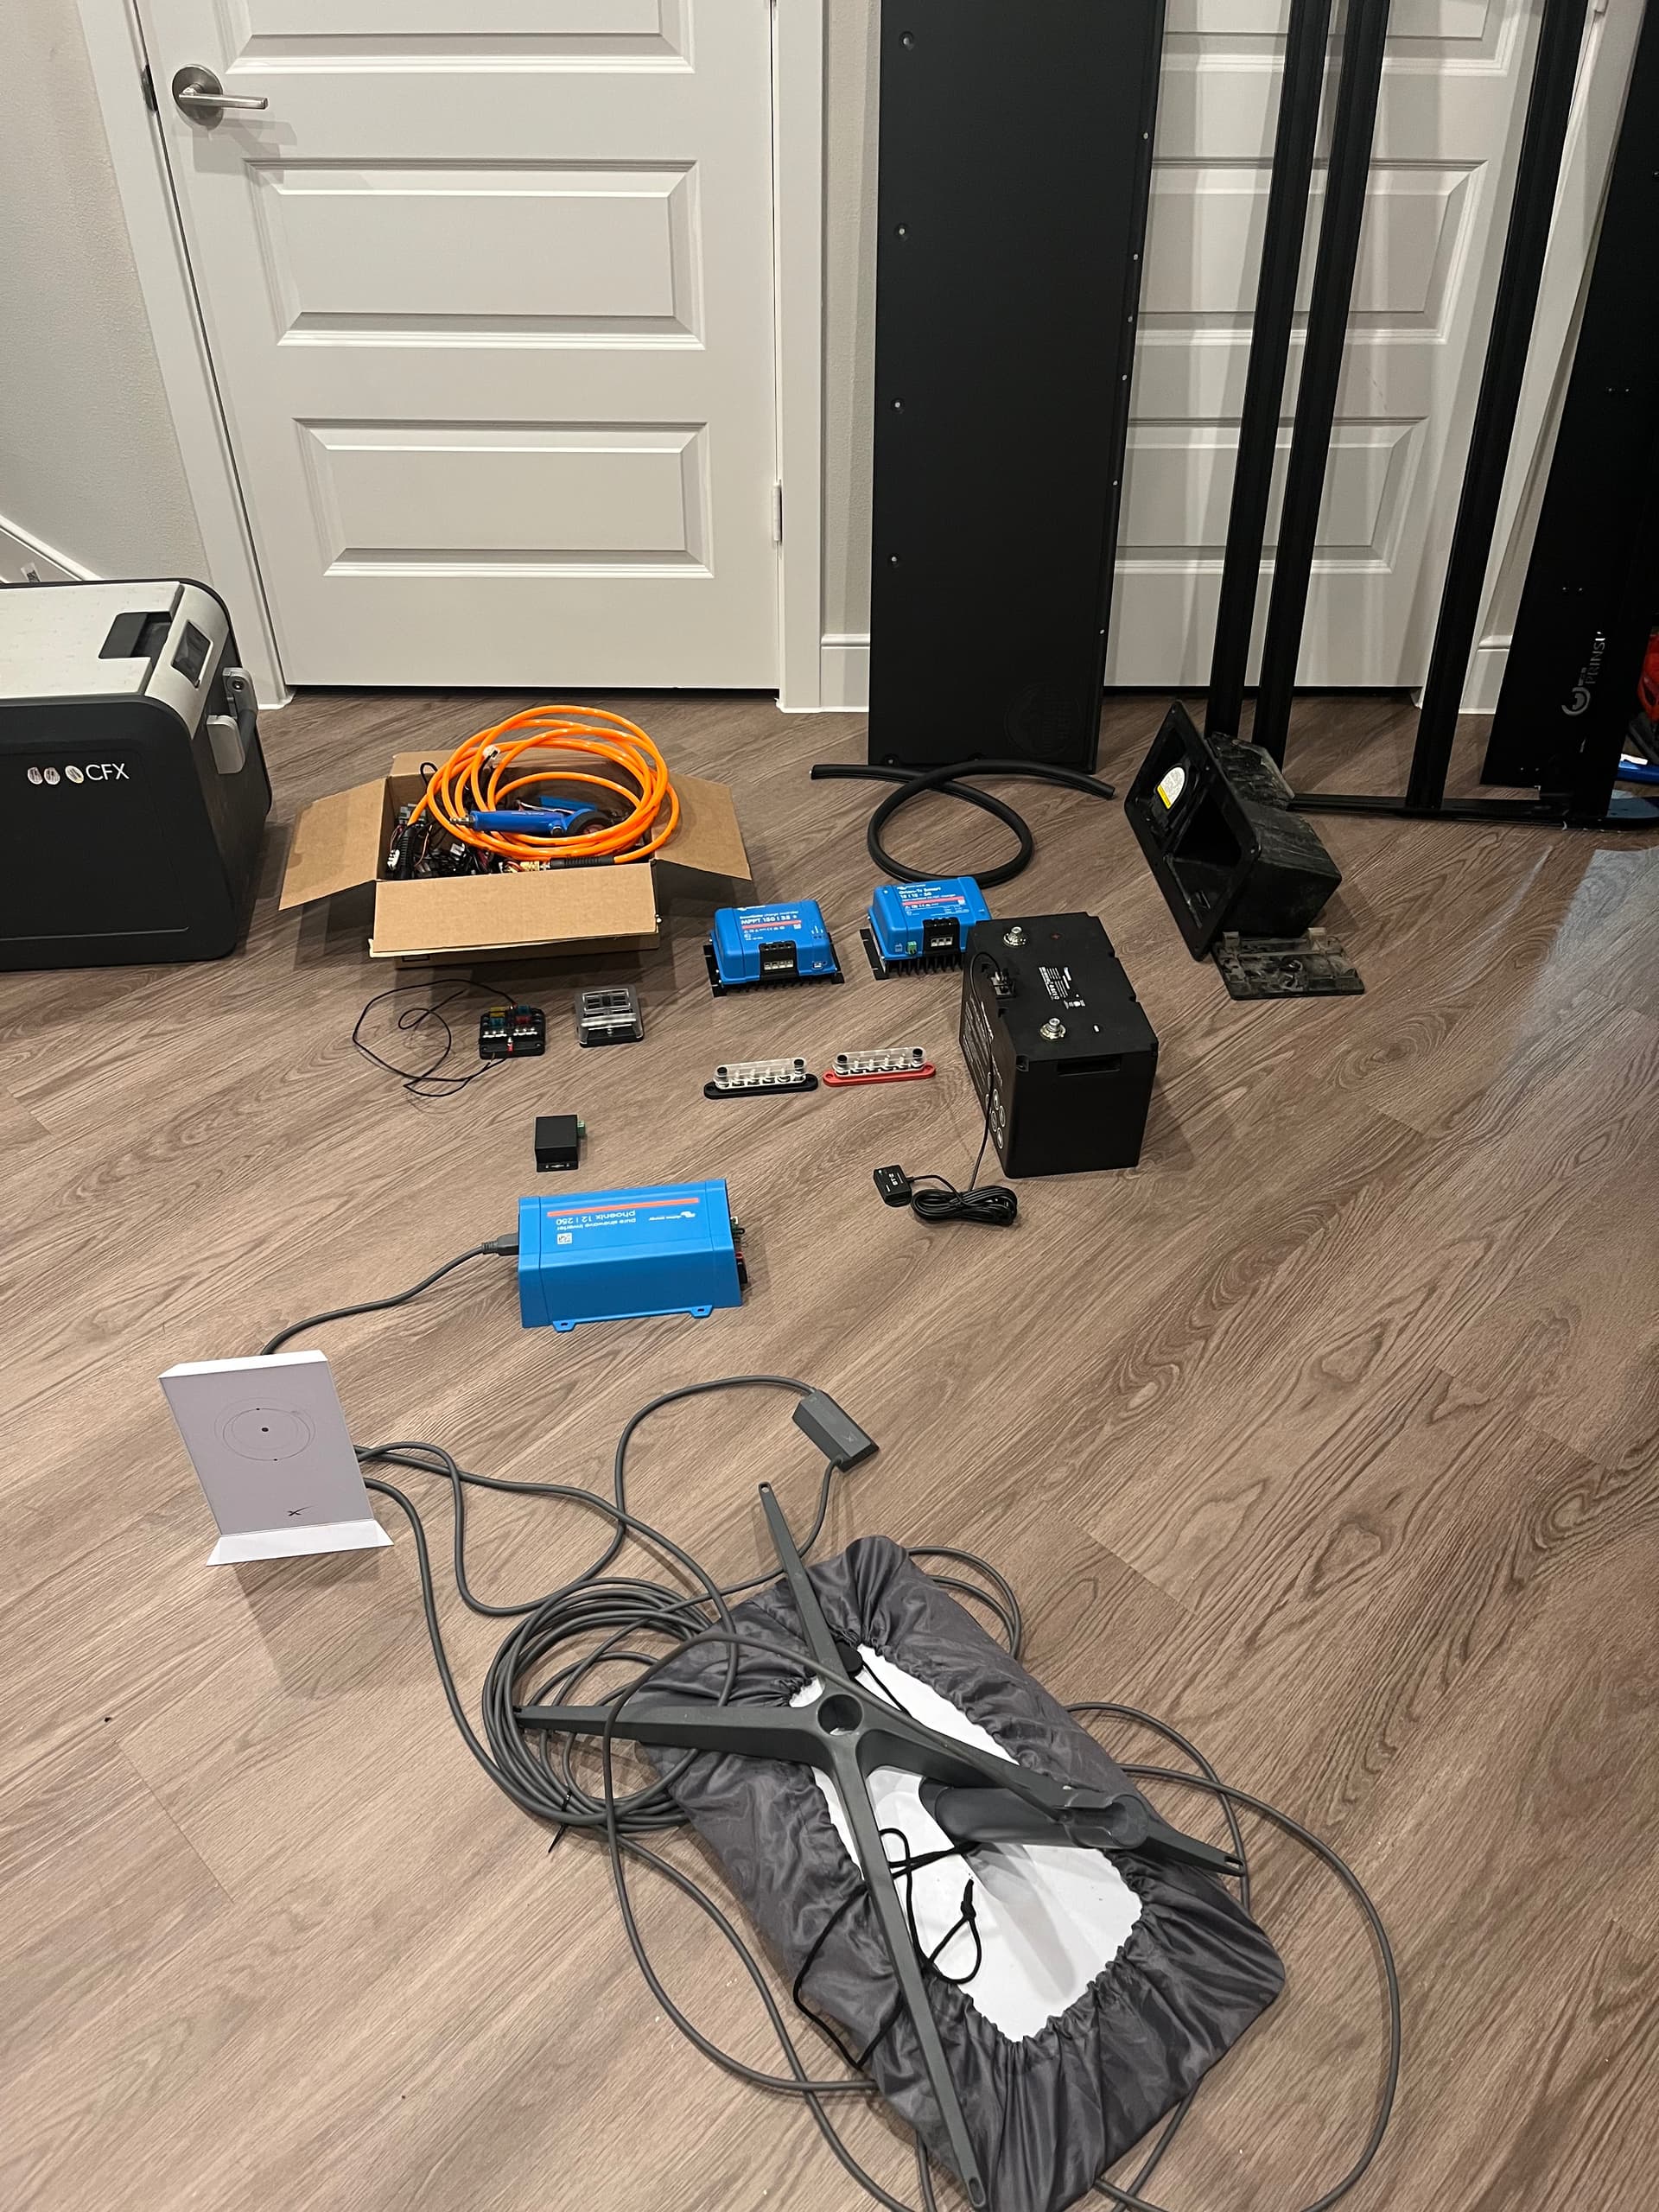
For this build, I’m choosing Victron chargers. They seem to have the best documentation on communication protocols in the market. Two 30A DCDC chargers plus an MPPT charger get me fast charging when my engine is running, plus full utilization of my solar array.

Batteries

Based on my power budget, 100Ah is the least I could possibly get away with, but I would have to keep the bank 100% charged at sunset to make it through the coldest, longest winter nights.

I am planning to use a REDARC Alpha150 battery. This thing is a beast. I was considering two 100Ah self-heating Battle Born batteries, but I was won over by the extreme power-to-weight density and the open communication protocols of the battery. The solution went from 2 batteries weighing 31lbs each to 1 battery weighing 34lbs.
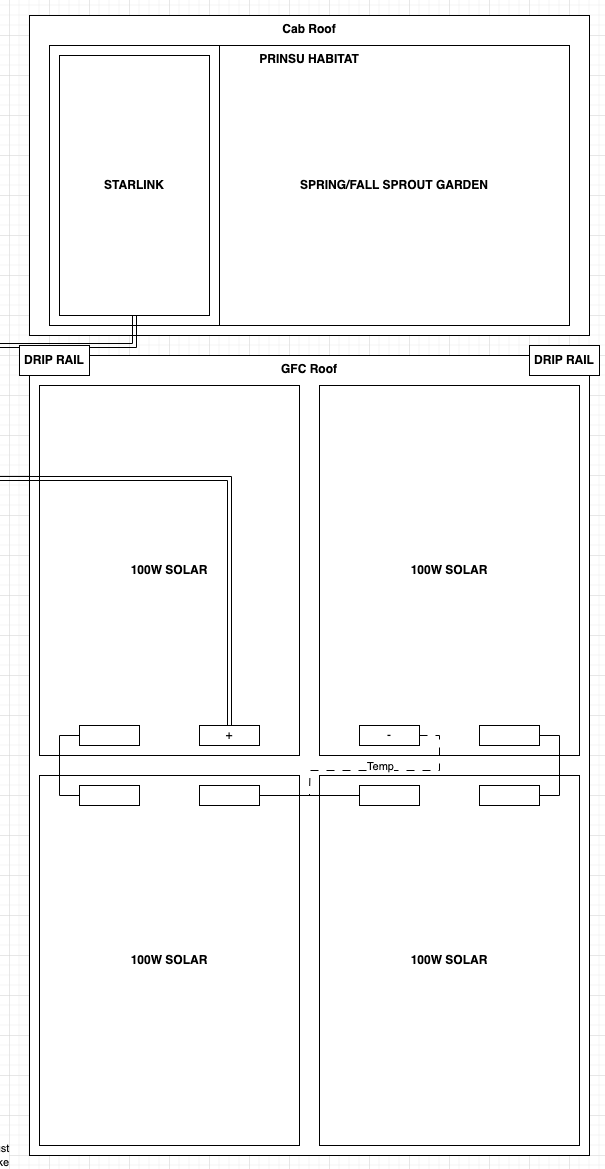
Starlink

I’m sticking with the Starlink system, but converting it to 12V using Dishy Dualie - I’ve pre-ordered this and it should be here in late October. I’ll pair it with a Ubiquiti Unifi router since the Dishy Dualie has a PoE injector for the router too.

HomeKit

I’m an Apple customer through and through - so I will have a HomePod mini in the truck to interface with HomeKit accessories. I’m planning to use a bridge from HomeKit to my camper’s CAN bus to control switches and read temperatures and tank levels.

Distribution Panel

Bus bars with fuses is all this is. My electrical loads will all be controlled over CAN bus, so I should only need to make +12V and CAN connections since all the grounds can be referenced to the chassis. This is what CAN bus was designed for, after all - reducing the amount of copper. Copper == weight

Ducting

Okay, let’s jump to the back of the cab and talk about this duct box. On the back wall of the tacoma cab there are two rectangular vents that vent to the bed. These are there to make your AC system work, but I am going to hijack one of them to use as a passthrough into the cab. I am going to run heat and power through this opening. Heating is something I’ll talk about later, but it is coming from the bed, through the rear fenders.

Hint: the thermostat box is part of the heating system

iPad + Amp

This is a dream project and probably won’t happen until later, but here’s the idea - ditch the factory stereo for an iPad Air or iPad mini, and design an interface board that connects the iPad USB to an Amplifier, the steering wheel controls, and the backup plus front-facing cameras. I’m confident that you could do all of this from a microcontroller, but this is a low-priority project compared to everything else since that system already works.

I removed the DCM Telematics module since I don’t use the remote start feature or microphone and don’t like Toyota spying on me, and it is on my to-do list to bridge the right side speakers so I can listen to the right channel of my music again.

Other

Triple rated helmet - I was rolling around with 3 helmets onboard my MK1 camper - climb, backcountry ski, MTB. There are now many companies making helmets that do all three of these in one. I will be picking one up this winter.

Window shades - for sleeping and keeping things cool

Shovel - this is my recovery system. This is an overlanding vehicle. I don’t intend to get into situations that are serious enough to require a winch, and 100lbs extra on my weight budget for the lightest bumper + winch combo seems like a huge sacrifice. I don’t want to add MaxTrax to the outside of my vehicle because they are too easy to rip off, and seem like they have limited utility. For me, the shovel plus conservative decisions on where to go are my best bet. This logic is why I also don’t plan to add rock sliders to my rig. 100lbs of weight for something you could completely avoid using by calling it before you find yourself in a sticky situation seems silly to me.

Compressor - self-explanatory - I’m switching from an ARB Dual to an ARB Single (swapping with a friend), since I have zero intention of going to a wheel size that requires that much air.


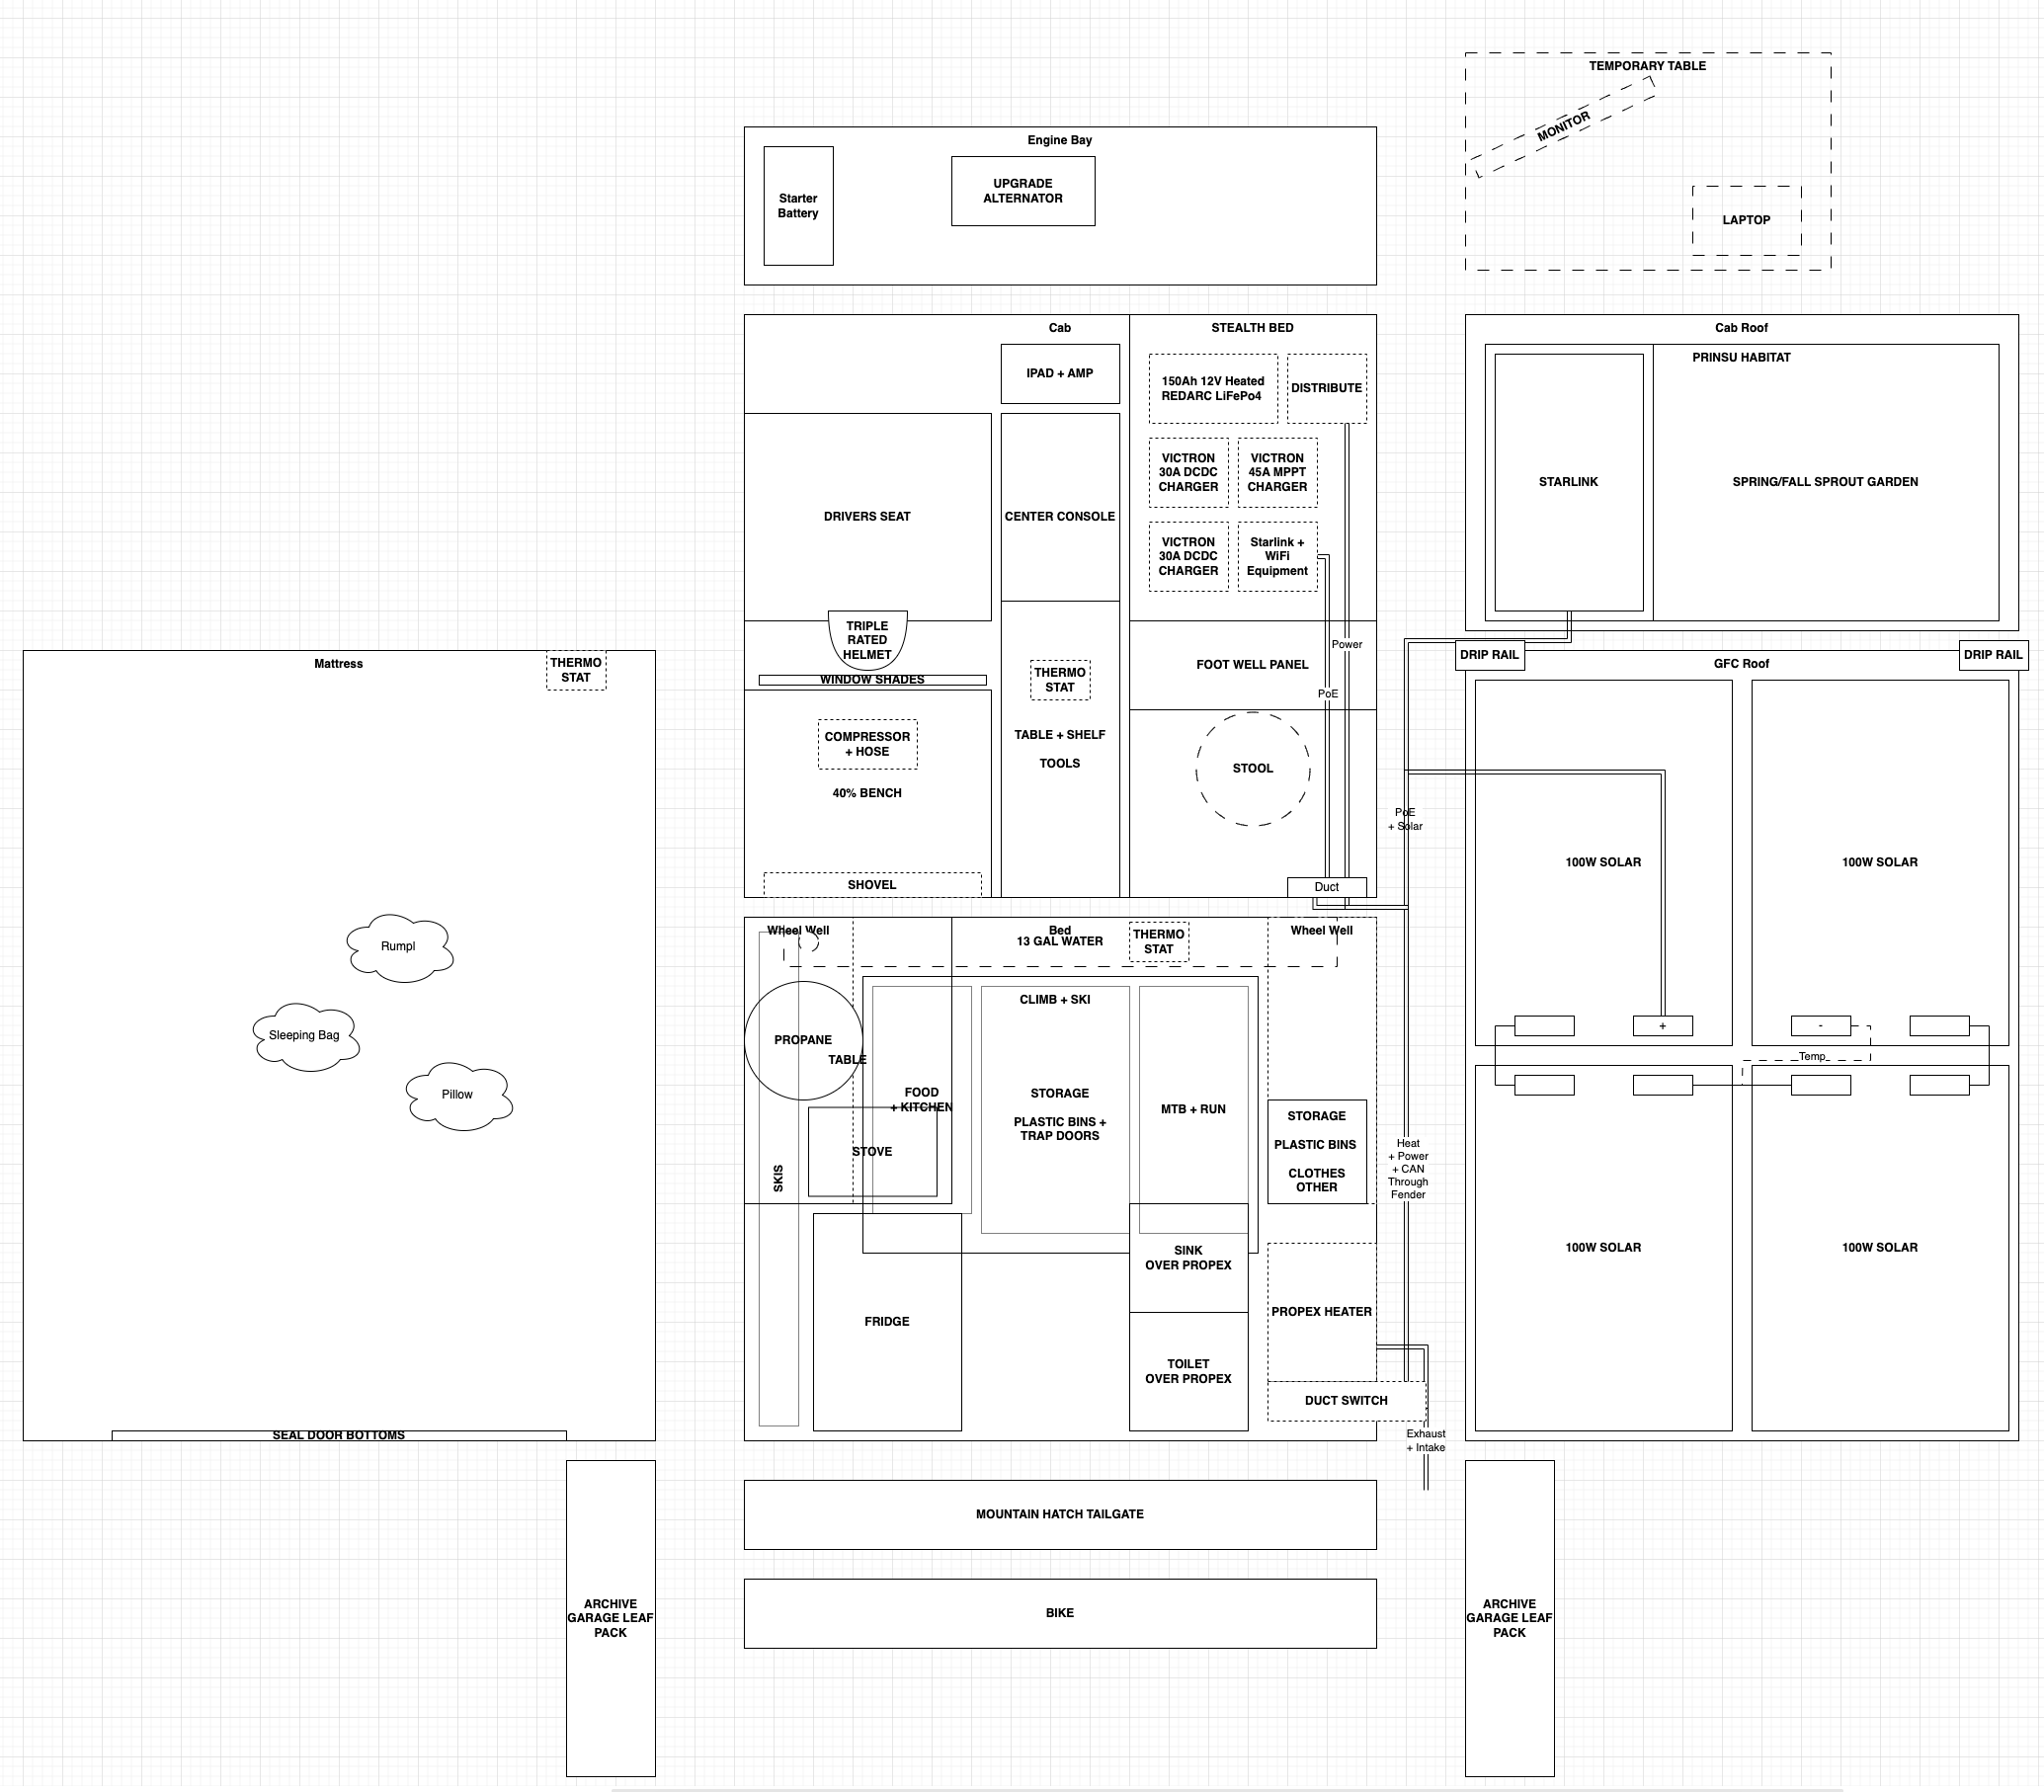
That’s all for today. I have the rest of the truck mapped out and I’m excited to keep writing. I wish I had more pictures, but the truck is in the shop this weekend.

Here’s a teaser of the whole system mapped out (latest in the link, snapshotted below)

2 Likes

At this point why not just move into a van?

I’d never want to use my sweaty and crusty mtb helmet for climbing or skiing, I like having separate gear for each

But I like what you got going on, looks well thought out

1 Like
  1. That would be way too easy
  2. Stock suspension on the Tacoma is far more capable offroad
  3. Toyota doesn’t make a van for the NA market that I’d want to build with

But mostly just point 1

2 Likes

Creativity is next level, no doubt about that. I just imagine the space and comfort you’d get out of a van would outweigh the off-road capabilities that you’d lose.

But I also know how expensive the van builds can get lol

1 Like

I’d like to thank you for taking the time to share your build with us. I look forward to witnessing your processes as you go along with your build. I have had many similar thoughts as yours, but with a 2017 DCLB. Of which, I’m still too tall for stealthily sleeping in the back truck bed area.

My 1st question I have is regarding:

As you go about trying this, I’d be curious to learn your thoughts - could a 6’5" person could keep the glove box and the airbag in place and still be able to manage bedding down in that space?

Thanks again, and thanks in advance for anything else I might learn from your build.

I’ll have to measure again when I get my truck back, but I think it depends on how high you build the platform. If you build it at 6” high so it sits on the back seat frame bump, it would probably work. I’m boosting mine to 10” high so I can store more underneath, so taking out the glove compartment helps a lot because I’m higher off the floor.

Roof

I’m stalling on sharing the bed details, mostly because I feel like it still needs some refinement. But the roof is ready to go.

Screenshot 2023-09-24 at 7.30.03 AM

Go Fast Roof

Super simple. 4x 100W flexible solar panels, wired in series. I had my solar array in parallel on MK1, but this was a mistake because it made the wiring ugly. With 4 panels in series, I can arrange them in a loop and avoid the 4:1 MC4 splitter. I will have to upgrade to a Victron MPPT unit that can handle the series voltage of all these panels, but that is no problem. I used Renogy panels on the last build, but I’m eager to switch to a better quality brand. I don’t want rigid panels because they weigh much more - a 400W rigid panel weights 50lbs, while my 400W of flexible panels weighs only 20lbs. Yes, my array is bigger - but weight is the main concern here.

Wiring will probably go over the front edge of the camper and directly into the cab. I have a gland on MK1 through the roof, but it’s ugly having wires dangling into the roof of the tent.

One thing I learned from MK1 is that beef bars over solar panels is a no-go. The beef bars shade strips of the panels, which effectively makes them useless because it creates a “kink” in the circuit. My panels are held on with SikaFlex (used sparingly around the edges so I can remove them if needed).

I had a starlink mount in the rear passenger corner of the roof, but I will be ditching that in favor of relocating the dish.

Prinsu Rack

I’m using the Prinsu Habitat rack for this build. I think the ~35 lbs is well worth it because it makes a bomber base for Starlink that doesn’t angle with roof of the GFC

Starlink Dishy

My starlink dish is going to be modified like the Everlanders starlink - I’ll be redesigning his mount to attach to the 8020 on the Prinsu Rack. The cable will be routed backwards under the camper cab-over and into the duct in the back of the cab - no new cable holes required.

The starlink dish I have has a 100 degree FoV, so I’m pretty sure there won’t be interference with the sky view when the camper is popped up.

Flex Space

The other side of the prinsu rack is open space. I might cover it so I can have a perch on the roof once the solar array is complete (no walking on solar panels). In the spring and fall, it might be cool to put a mobile garden on the roof to grow some small greens or roots. Garden + starlink == way to send pictures of me eating my greens to my mom!

Drip Rails

Lest I forget, @jedgar’s drip rails are a great addition to the GFC, and they totally work!

Tent

The stock Go Fast tent is a two season solution. Above 90 or 95F it cooks in there. Below 20F is also uncomfortable because it is super drafty. The tent fabric is breathable, and the doors let wind blow freely in. Whenever it is cold enough to need a heater, as soon as the heater turns off it gets cold very quickly. I know that others have done velcro to seal up the doors, or bigger insulated setups. I think I’m going to opt for velcro on the bottom of the doors as a first stage. That will get me through this winter. Pushing the upper end of the temperature range is mostly a matter of getting misters, fans, and a bug net + repellant solution so I can leave all the doors open.

Quick vent about Air Conditioning (pun noticed) - why does thermodynamics have to be such a b***? I won’t be putting an AC unit in my build because all options I’ve seen take a massive part of the roof, weight at least 50lbs, and require gobs of electricity to run. When you factor in the extra energy in batteries and solar that I don’t have space for, the system weighs 100lbs minimum, likely more like 150lbs. I’ve looked into PCMs (Phase Change Materials) that use latent heat of melting as a passive solution, but the weight is every bit as bad because now you’re carrying around a thermal flywheel. Propane fired ammonia chillers used to be a thing (IcyBall) but I don’t want a ball of high pressure ammonia on my camper for obvious reasons. Evaporative coolers are nice, but what if I am somewhere too humid for those to work? There just aren’t any good solutions for actual chilling - so I’m going to wear lots of cotton, and invest in some fans with misters.

The other thing I’ve been considering is replacing the entire tent with a fabric that is more suitable for the cold. I’m handy with a sewing machine (spent two years in Outdoor Product Design school at USU), so I feel like I could hack something together. I’ll think more about that later. One thought I’ve had is to look at replacing the tent with some rigid panels that fold origami style.

1 Like

So remember an hour ago when I said AC was impossible? I’m having second thoughts. The Tacoma already has an AC system. The problem is that it requires the engine to be running to power it, since the compressor is driven by a belt from the driveshaft. What if you put one of these compressors in parallel with the compressor coming off the engine, and reuse all the other heavy parts of the AC system? I already had a duct between the cab and the bed planned for my heater, so pushing cool air through the cab and into the bed is possible.

This weighs 11lbs. If this consumes 500W when on and I run it for 6 hours a day, I’d need at least 400W more solar and at least double the battery storage, making the system cost about 50lbs of my weight budget.

For now, this is going on the back burner, but next spring I’ll think more about it.

1 Like

Might want to look into hood mounted solar panels. I know of two sources; CASCADIA 4X4 VSS or LENSUN

Long comparison & review video but thorough: https://www.youtube.com/watch?v=4Y9T60KfSRs&t=580s

1 Like

I had no idea that was a thing. Thanks for sharing!

My take on it is that I already have 400W on the roof, so 85W isn’t enough delta to justify the high cost of these custom panels. I think the better bang for the buck is a high wattage folding panel that can be set up at camp, since you have alternator power when the truck is moving, solar is just a nice to have to reduce the work the alternator has to do. Plenty of different options out there.

Working on the cab design this week. Ordered all the starlink and roof parts over the weekend.

Has anyone on here sourced honeycomb composite panels before?

This is going to be a cool build, very cab focused. Interested to see the results!

My world domination scheme isn’t changing, but this week I realized I still needed a weekend getaway vehicle that can be a temporary office for up to a week while I’m working on this build.

Introducing…

Steezemobile MK1.5

All the things you like about MK2, but attainable in the next month. Basically MK2 stripped down, using some parts I already have and others I was going to buy for MK2 anyways.

Upgrades from MK1:

  • Electrical system - add 100W more solar for 400W total, change out chargers, change location, clean up wiring.
  • Rough out “stealth bed” and “stealth desk” in the cab

Skipping MK2 features:

  • Heater
  • Lighting
  • Water storage upgrades
  • System monitoring upgrades
  • More complex storage systems

My truck is getting out of the body shop tomorrow, so I’ll have the weekend to install all the stuff I ordered earlier this week.

This morning I taught myself OnShape and designed the 4 blocks (2 of each) that will hold up my sleeping platform. These will be printed from ASA (same plastic as most parts in your car) on my printer.

I’m a huge fan of OnShape. It is in your browser, it’s free for most cases I care about, and the modeling experience is head and shoulders above all the other programs I’ve used. That’s saying something because I’ve spent months in F360, Solidworks, and Inventor. I’ve run a business using Inventor, and learned Solidworks in school.

Anyways, tonight I get to mess around with printer settings and get a test part made. Then I need to measure my truck tomorrow when I get it back to make sure I nailed all the dimensions.

1 Like

One more update for today. I gave up on the idea that the 3D printer I have could cut it for the number of printed parts that I’m going to be printing for this camper, so I ponied up for a Prusa i3 MK3S+. I’ll probably keep the Creality Ender printer around to print small parts, but between the bed size and the speed limit of this printer, I need a beefier tool. I have the Prusa i3 MK2S 5 years ago, so I know the MK3 will handle this without a problem.

Victron MPPT showed up today, DCDC and inverter should be here tomorrow. Prinsu rack too. This weekend is going to be a party!

1 Like

All ready to go for this weekend! Installing

  • Charging system
  • 100W more solar on the GFC
  • Starlink supply (temporary until I get the DishyDualie)
  • Mountain Hatch
  • Prinsu Habitat Rack

It’s going to be a busy weekend, so hopefully I can get most of it done.

1 Like

This will be cool.

Just so I am understanding correctly, you’re looking at completely removing your passenger seat also to make that side an indoor bed if needed?