What have you done to your GFC this week

Ok this is awesome but can you explain the TV? Do you use it for demos, etc.?

What do you like better about the C5 compared to the originals? My biggest gripe is that inserting the keys is really a pain with the ones that GFC provides.

Recently tweaked our small radio setup in the truck. It’s still a pretty low-budget installation, just under $120 for everything. Eventually, we would like to install a more powerful setup (for other nerdy HAM radio-related activities), but for now, this works great!


Heres a list of everything we used.
UV-5R8W Radio
SMA Bulk Head adapter for GFC 90º Bracket
USB Power Cable
Flexible SMA Cable
GFC 90º Bracket
25’ SMA RG-58 Cable
Super Technical diagram

7 Likes

Ah, perfect. Did not notice that.

Based on this comment are you also in tech sales (like me)?

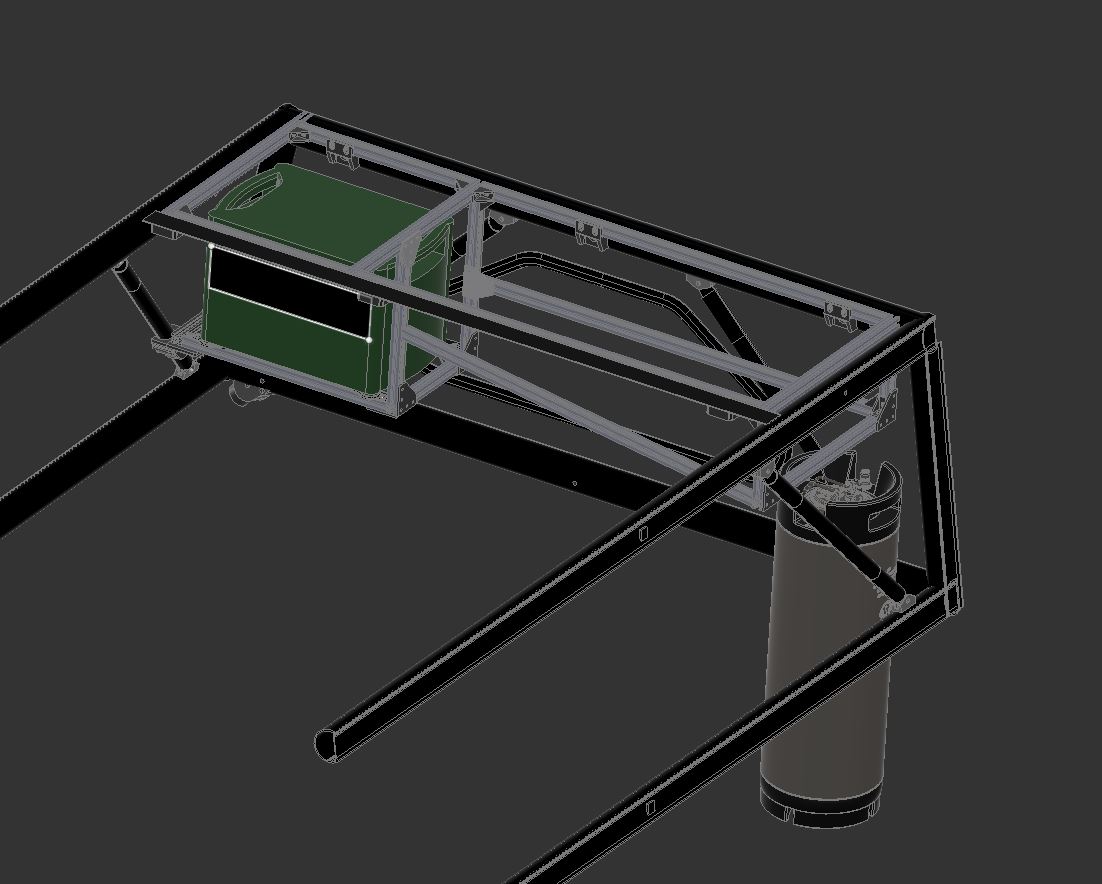
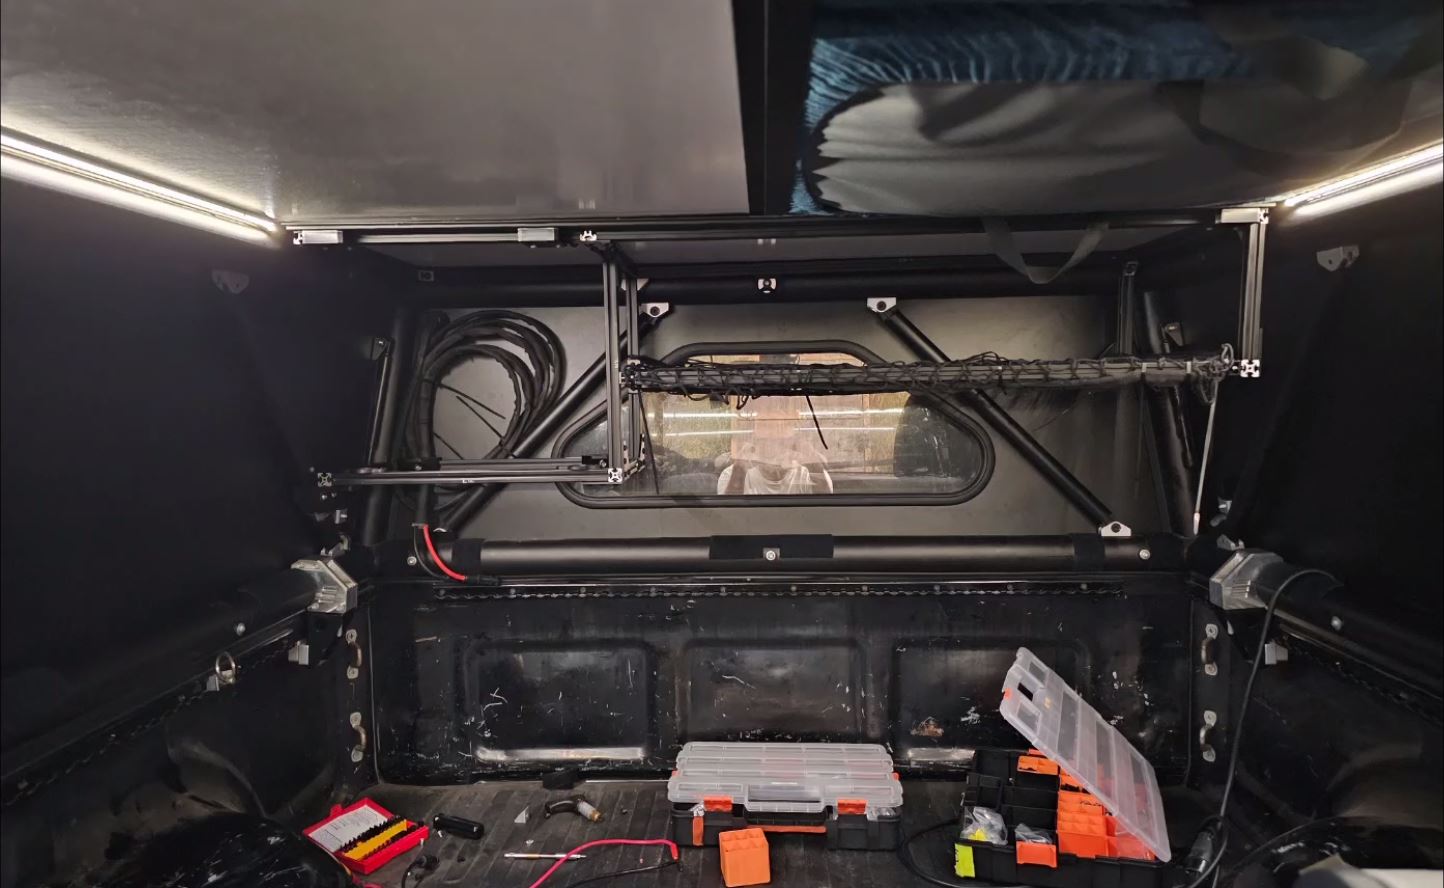
Designed and built a new rack for my Goal Zero and bedding.

Keeps the floor clear.


13 Likes

I’m just a big sports fan, man.
I’m outside most of everyday so getting out in nature isn’t really a break from the chaos for me.
I usually bring my iPad and have a game on when I’m camping and figured for the price of a $30 mount and TV I already had it was worth a shot. Not sure if I’ll use it much but I’m guessing when I do I’ll be pretty pleased :slight_smile:

4 Likes

Nice simple setup, I like it!! This also reminds me I need to get my Ham license.

1 Like

I see you have your UV-5R programmed with channels similar to mine, and like you, I absolutely am not transmitting on those channels, just listening as per the law ( :shushing_face:). It’s definitely nice to have a single HT that can cover many radio licenses.

I have some extra RG58 leftover after I shortened my antenna cable in the truck, was thinking of doing something similar and making a short jumper to connect my UV-5R to the better antenna.

1 Like

You should do it! I studied and took my test via hamstudy.org they have practice test and study guides as well. After a week of studying each evening for a bit I passed my test easily, you can also take the test online now via a zoom meeting.

We actually carry 3 radios with us, two UV5G’s that are gmrs legal, and than this UV5R8W witch we use most of the time, but only in the frequencies that it’s legal. :wink:

2 Likes

Ok, this is clean!

1 Like

Recently swapped out the amazon recovery board for some legit MAXTRAX in gun metal grey that match our paint that we picked up from Adventure Imports Mounted them to the side panel with their 17mm mounting pins, and upgraded the gas struts to support the additional weight. Having these much more accessible than the last set has been nice.

for mounting them: I taped off the inside of the panel to mark where the diagonal supports are so that we were sure the pins wouldn’t interact with them when the panel was closed. Next, it was just a matter of marking out the center on the panel and transferring the measurements for the mounting locations of the pin from the board to the panels. I made sure the boards were low enough not to interfere with the top hinge, but not so low that they would put more stress on the gas struts. The existing holes from our previous set of boards are just covered on both sides with some gorilla tape, and have proved to be an easy rain-tight seal.


4 Likes

Mmmm, sexy

Just installed the window cover from Overland Softgoods (@WrinkledPants). Great quality and super easy install. It’ll be nice to have a little more privacy in the bed (but still not the tent) for my upcoming Baja trip!

4 Likes

Spent the last three days slowly building a new storage shelf that will also double as the Deisel heater mount for winter camping


I wanted it to hold four front runner Wolfpacks underneath and two large husky bins on top during the summer without impacting rear window visibility.


My favorite part is that it uses existing factory mounting points on the gladiator so I didn’t have to drill any new holes in the truck.

10 Likes

Doing a dry run tonight now that I have more bracing and the diesel heater installed. No exhaust line run yet as I want to make sure the mount is stable before drilling into the side panels. Heater is mounted on an angle for the pump to wood blocks that are then double mounted using brackets to the platform. Under the exhaust sits two layers of reflective insulation sandwiched between a steel plate and aluminum diamond plate. The exhaust itself will be wrapped in heat tape and then plumbed out the side panel.

The heater is also strapped down using two adjustable bungee cords attached to mounting points on the shelf itself.

Fun surprise. My medical/first aid kit fits perfectly in the side cubby over the wheel well!

4 Likes

Nope. Refuel through transformafloor when at camp or packing for the trip. The plan is to run with one panel removed so the truckbed and tent stay warm

I’m gonna be that guy, and say that this is kind of a risky way to install a diesel heater. You should avoid having the combustion exhaust or intake connections exposed to your “living space” (i.e sharing the same air as you when you’re inside your camper with all the panels closed). That is not to say these connections can’t be inside, but in that case, the unit should be in some kind of locker with its own separate connection(s) to outside air. This is more common in boats (I’ve found boat forums are great for build ideas btw), where some heaters can only be installed with the combustion connections facing down, and you probably don’t want to cut a hole in the bottom of the hull. Otherwise, the options are to mount with the combustion connections outside, usually through the bed of the truck, or only run the heater outside and duct the air in.

These connections can loosen, and sometimes the hoses themselves aren’t even gas tight to begin with. While in normal operation, these heaters usually don’t produce a high concentration of CO, that can change if the intake gets impeded, or CO leaks and gets recirculated. A CO alarm could save you in such a situation, but that shouldn’t really be a substitute for safety precautions with the install.

Now to be fair, you can install it this way, and in all likelihood you’ll face no ill consequences, especially if you never run the heater overnight. I’ve seen similar installs on YouTube, and those people are still making videos. But there are safer ways, and I would be remiss if I didn’t say something.

Safety police rant over. I dig the shelf. It looks super functional, but nice and simple. Nice work!

4 Likes

I agree wholeheartedly with everything you said. I spent weeks forum Hopping and YouTube hopping to find a viable solution that did not require a major hole being cut into my truck bed. The solution was a small exhaust hole cut into the side panel

I am not a fan of sleeping warm (I prefer cold weather and enjoy the zero to -20 temps when camping but I absolutely hate having to get ready when it’s that cold.

The plan all along is to vent the camper shell as suggested by GFC for cross breeze and then keep the tent flaps by my feet open and a small crack on the front flap as well. The hope is simply to have warm air for my feet when I put my pants on and to keep my batteries from freezing overnight and being useless.

I tried the buddy heater and it did more harm than good as the condensation was brutal and created instant frost on the inside of the tent that was near impossible to dry out mid winter last year.

I have two carbon monoxide sensors that I’ll be running (overkill is better than being killed)

One in the tent with me and one in the truck bed with the heater. There will be a cushion removed to allow the heat to rise and for positive airflow.

I’m not sold on the heater I have and fully believe I’ll swap it out for something better/more secure in the future.

I agree this is not the “best case” use and mounting and likely goes against code somewhere but given the unique winter camping situation it’s better than nothing at all and certainly better than the wood stove I was originally thinking of installing :joy:

5 Likes

The finished product….so far. The exhaust port is better than I expected and looks pretty cool from the outside. I’ll need to find a plug for it but otherwise I’m content with the exterior.

I’m not terribly happy about the exhaust pipe and how it’s triple wrapped. It’s in heat tape but I got paranoid so wrapped it in two layers of reflective insulation with an air gap between the pipe and the insulation to avoid burning anything even with the heat tape.

So far so good. The aurora is out, it’s 10 degrees, and I’m laying down without a sleeping bag in a tent that’s roughly 60 degrees……why did I not do this sooner


13 Likes